Imagine walking out the back door on a summer evening with a colander in hand, stepping along a gravel path, and picking ripe tomatoes, crisp lettuce, and a few peppers from neat wooden beds without bending to the ground. Dinner is already halfway done.
That’s why so many homeowners build a raised vegetable garden. Raised beds warm up earlier in spring, drain better after heavy rain, and let you fill them with loose, rich soil instead of fighting clay or rocks. They also keep the garden tidy, so even a vegetable plot in plain view can look like part of the landscape.
These 23 raised vegetable garden ideas cover full-yard layouts, materials from cedar to Corten steel, crop-specific beds, and practical upgrades like drip irrigation, critter-proofing, and season-extending covers. Use one idea to get started or combine several into a garden that feeds your family for years.
1. Arrange Matching Beds Around a Backyard Greenhouse
A layout with a built-in focal point
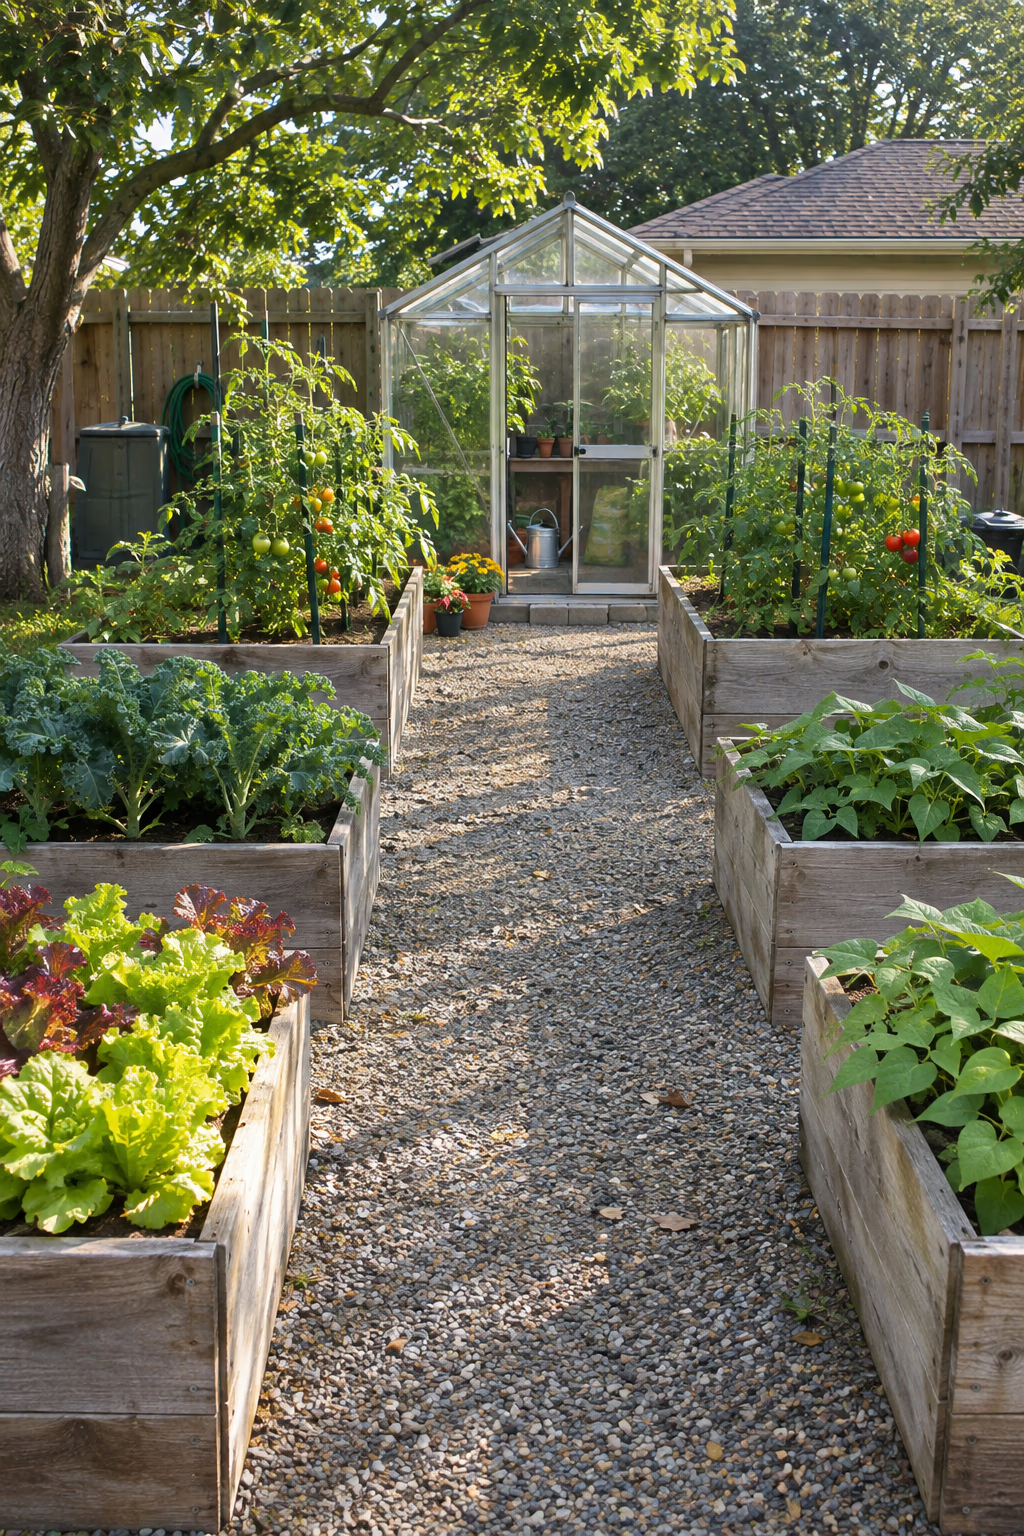
Set a small greenhouse or glass-sided cold house at the center or far end of the garden, then line up four to eight identical raised beds on either side of a central gravel path. A footprint of roughly 24 by 30 feet fits a 6-by-8-foot greenhouse and six 4-by-8-foot beds with comfortable walkways.
Symmetry makes a vegetable garden look intentional even in midsummer when plants sprawl. The greenhouse also earns its place: you can start seedlings in early spring, ripen late tomatoes in fall, and walk only a few steps to transplant into the beds.
Place the greenhouse where it won’t shade the beds, usually on the north side of the layout. Check whether your town or HOA requires a permit for accessory structures before you order one.
2. Enclose Your Raised Beds in a Wood-and-Wire Kitchen Garden
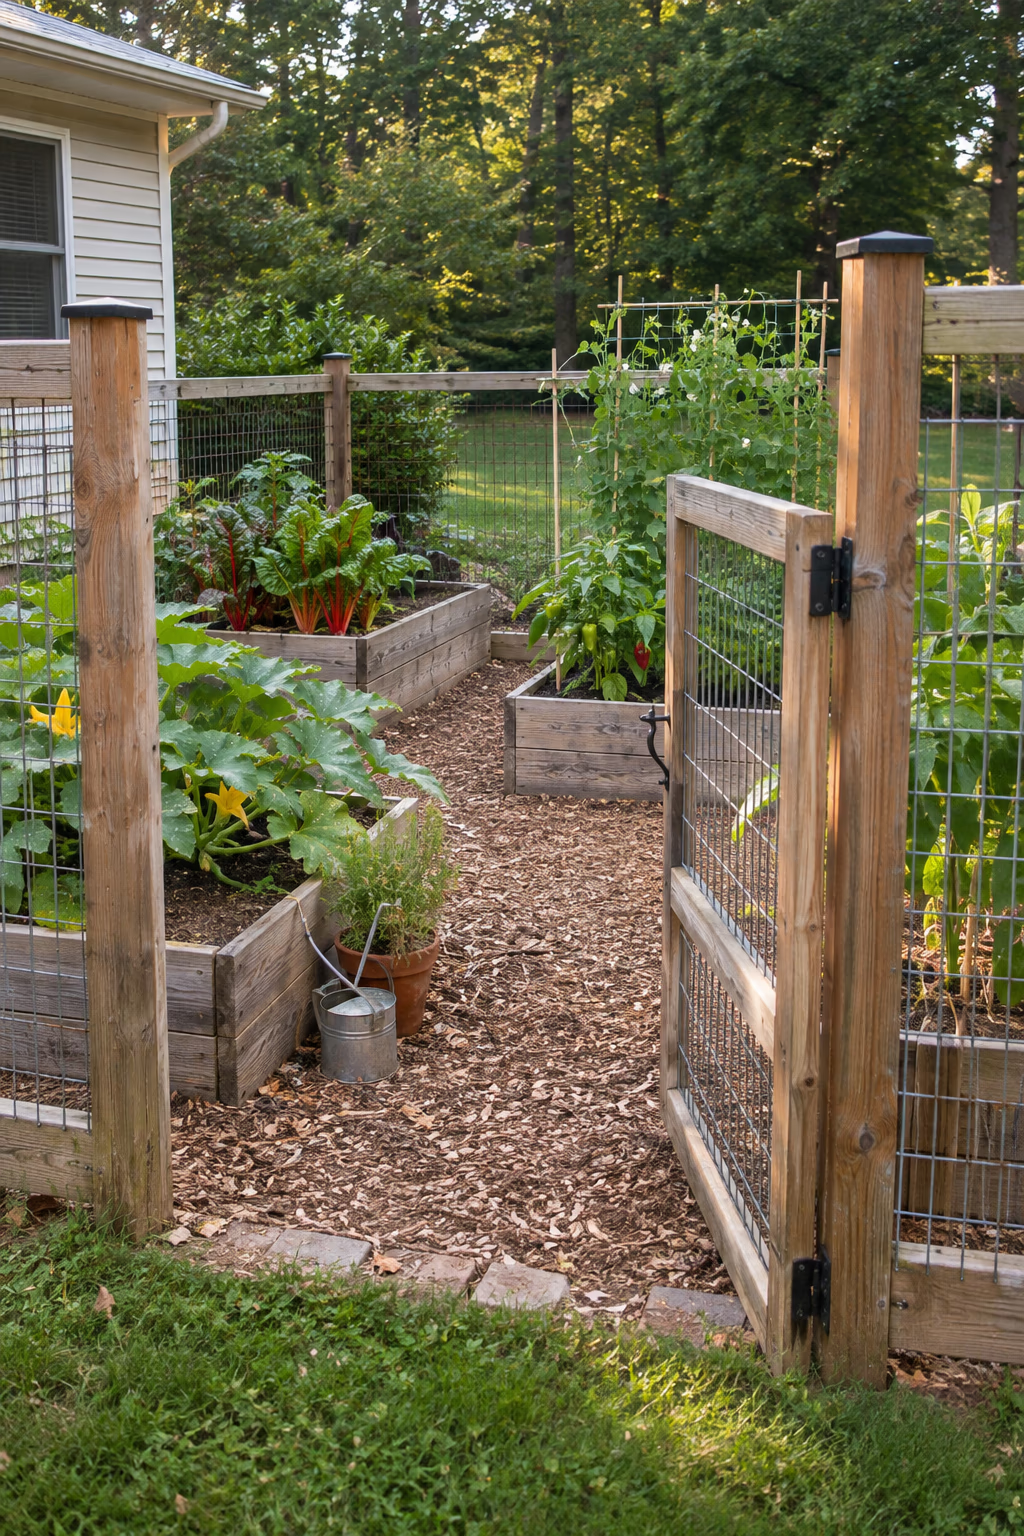
Keep rabbits and deer out without hiding the view
Build a simple frame of 4-by-4 posts around a group of beds and fill the panels with welded wire, then add a matching gate wide enough for a wheelbarrow. A height of 4 feet stops most rabbits and groundhogs, while 7 to 8 feet is needed where deer are a real problem.
The enclosure turns scattered beds into a defined garden room. Gravel or wood-chip paths inside it stay clean, and the wire lets light and air pass so the beds don’t feel boxed in.
Bury the bottom of the wire 6 to 10 inches or bend it outward along the ground to stop diggers. Untreated wood posts rot at the soil line, so use ground-contact rated posts or set them on metal post anchors.
3. Give Tomatoes and Basil Their Own Long Bed
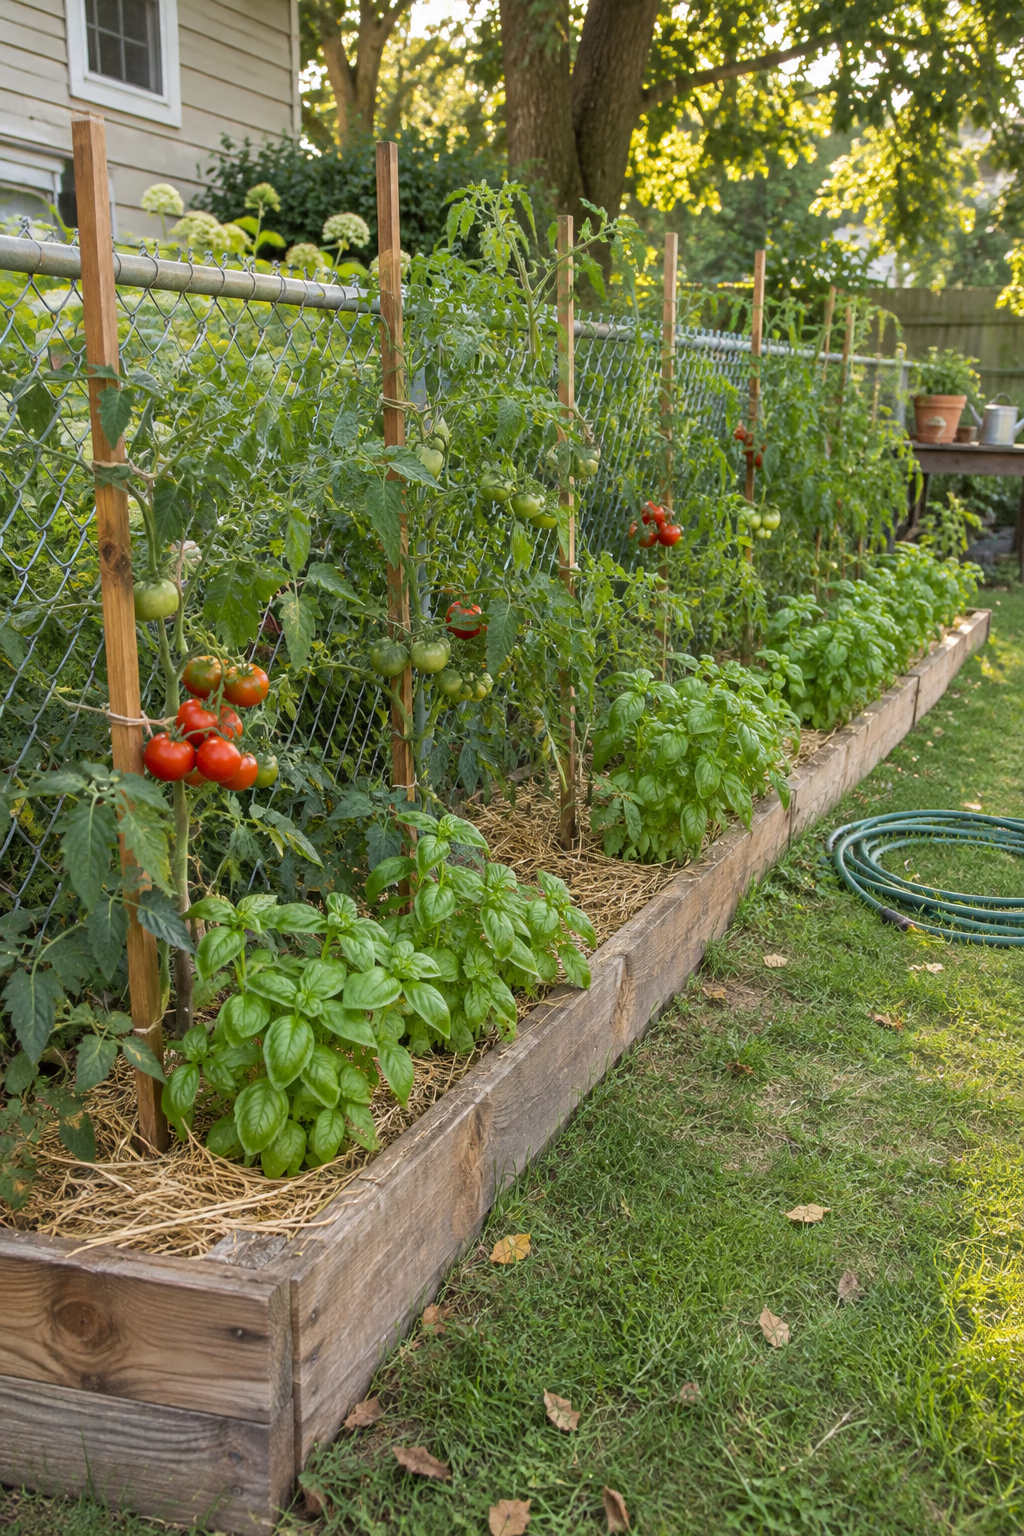
One bed devoted to summer’s favorite crop
Build a narrow bed about 2 to 3 feet wide and 10 to 12 feet long and give it entirely to tomatoes, spaced 2 feet apart, with basil tucked along the front edge. A long, narrow bed lets you set a single row of sturdy stakes or cattle panel supports down the back.
Tomatoes are the crop most home gardeners care about, and keeping them together makes staking, pruning, and watering much simpler. Basil fills the open soil at their feet and is ready to pick at the same time for sauces and salads.
Plant tomatoes deep, burying part of the stem so it roots along its length. Rotate this bed with another each year if possible, since tomato diseases can build up in the same soil.
4. Wrap a Patio Edge With L-Shaped Vegetable Beds
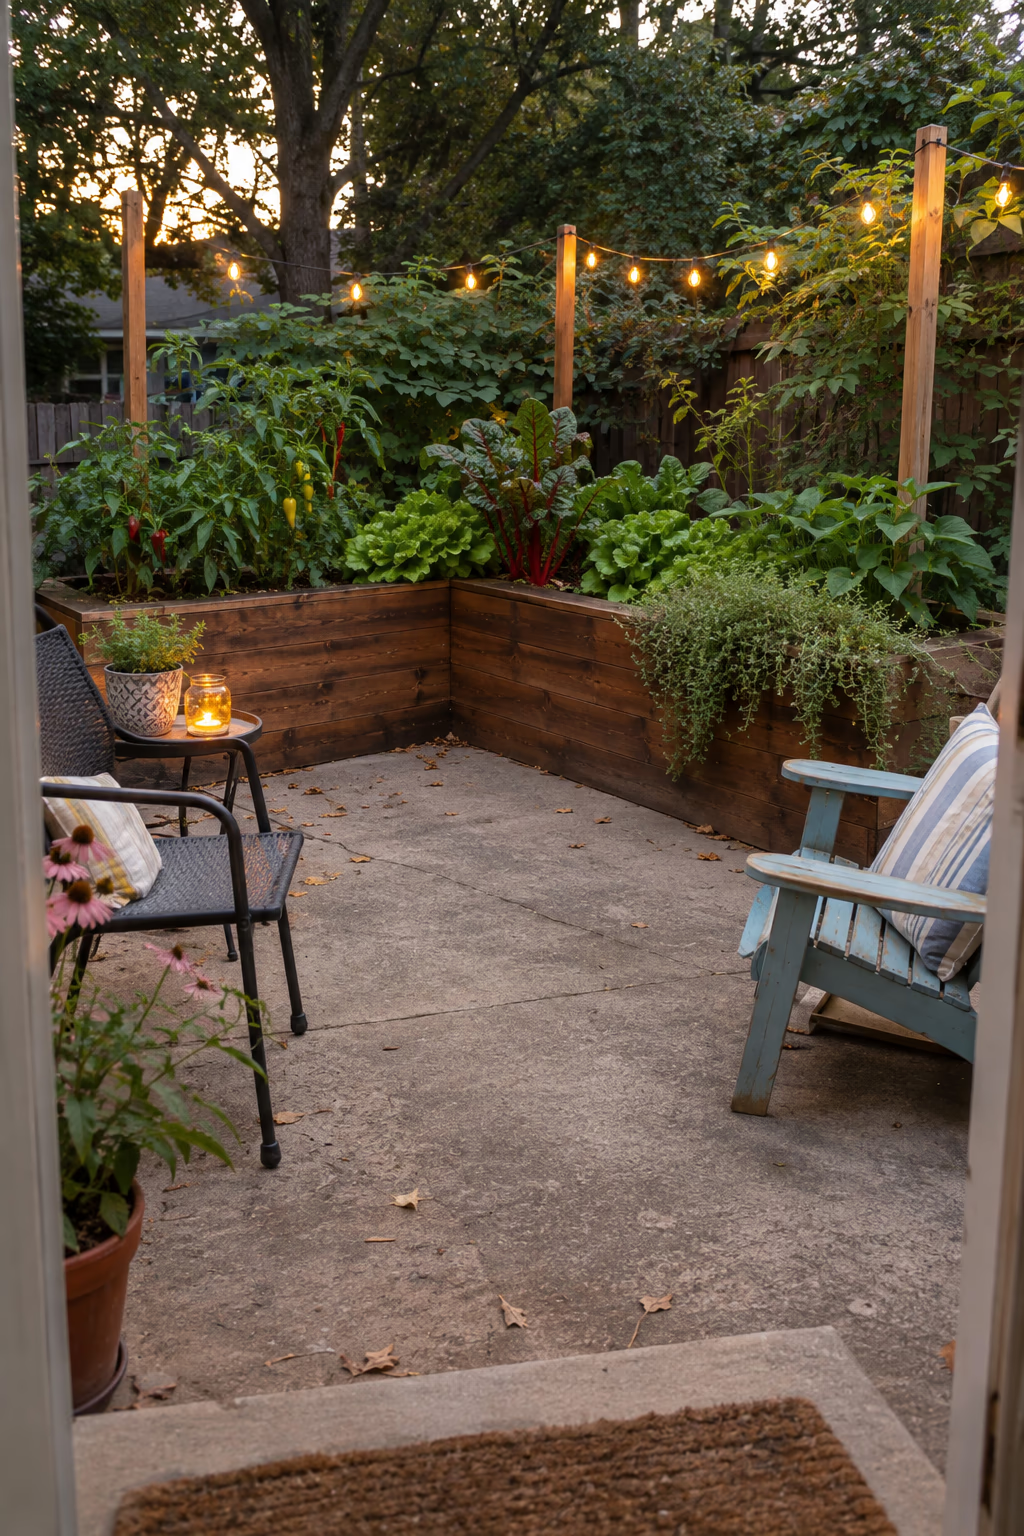
Turn the space you already use into a harvest zone
Run an L-shaped raised bed 18 to 24 inches tall along two sides of a patio, keeping it 2 to 3 feet deep so every plant is within reach from the paving. Fill it with compact crops like bush beans, peppers, chard, lettuce, and trailing herbs that spill over the edge.
Beds at the patio edge get checked, watered, and picked far more often than a plot at the back of the yard. String lights strung overhead or a pair of simple arches turn the same spot into an evening hangout.
Leave a small gap between the bed and the house siding so moisture doesn’t wick into the wall. Make sure the patio side still drains so rainwater doesn’t pool against the bed.
5. Move the Vegetable Garden to the Front Yard
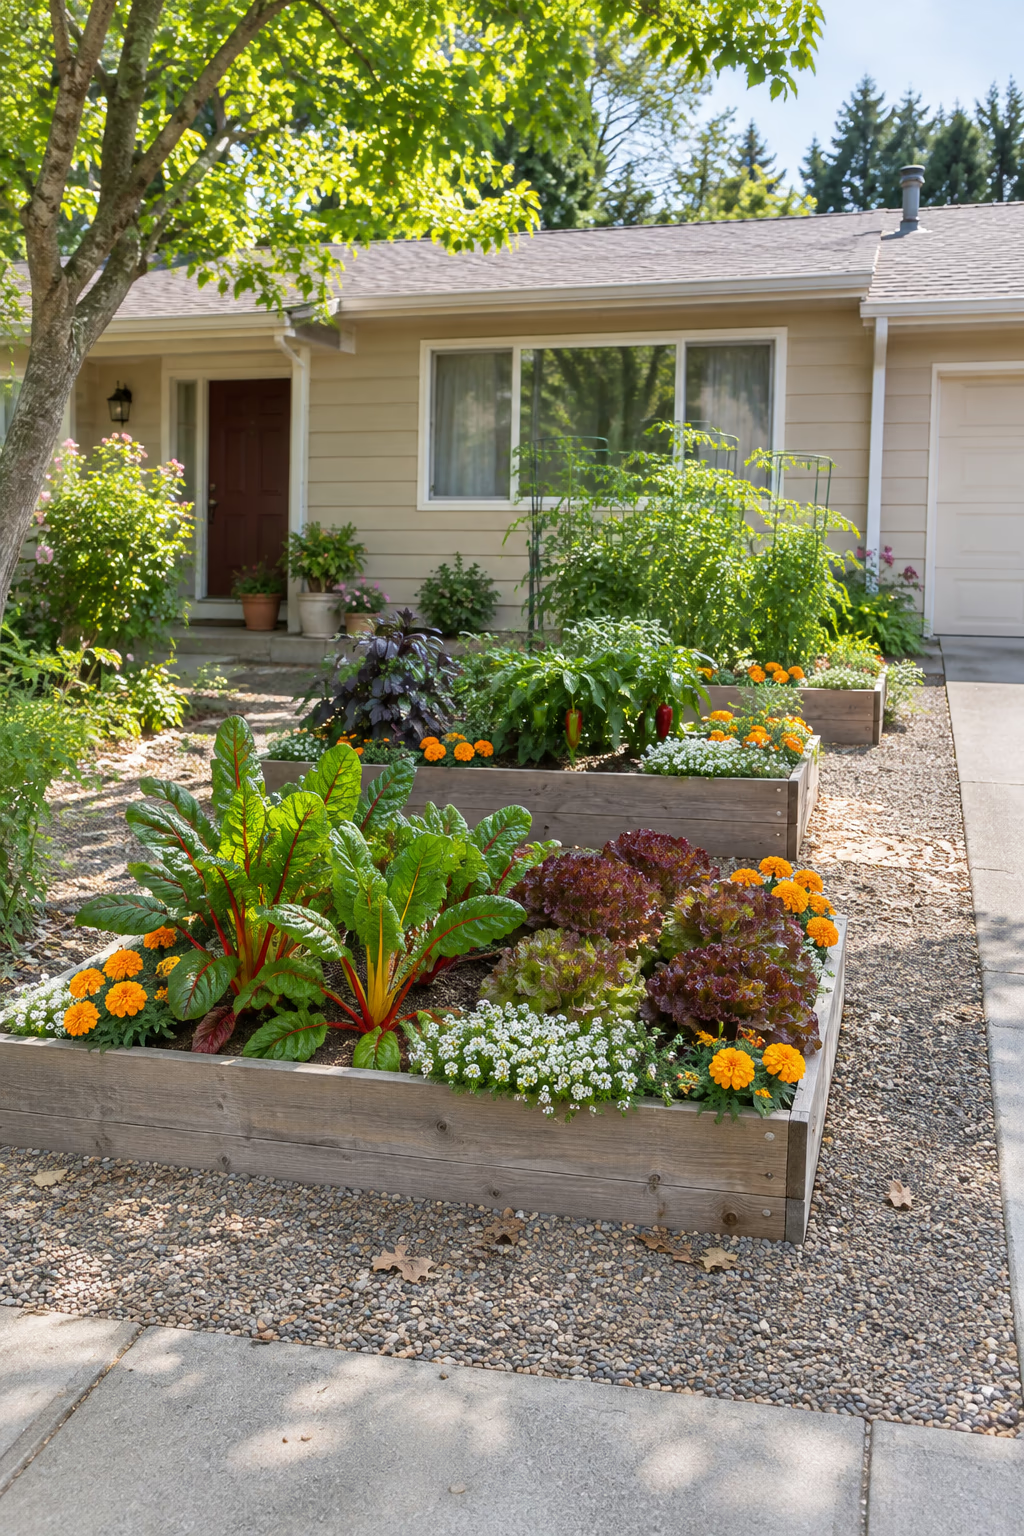
Use the sunniest spot on the lot
In many homes, the front yard gets the best sun. Replace a section of lawn with two or three crisp, rectangular raised beds set on mulch or pea gravel, and edge them with low flowers like marigolds, alyssum, or dwarf zinnias to keep the look polished.
Front-yard beds can look as tidy as any foundation planting when they share a single material and line up with the house or driveway. Ornamental edibles like rainbow chard, purple basil, and red-leaf lettuce add plenty of color.
Check your HOA rules and local ordinances first, as some limit vegetable gardens or structure heights in front yards. Keep beds well back from the sidewalk and away from where road salt or snow piles land in winter.
6. Paint Wooden Beds Charcoal for a Modern Edge
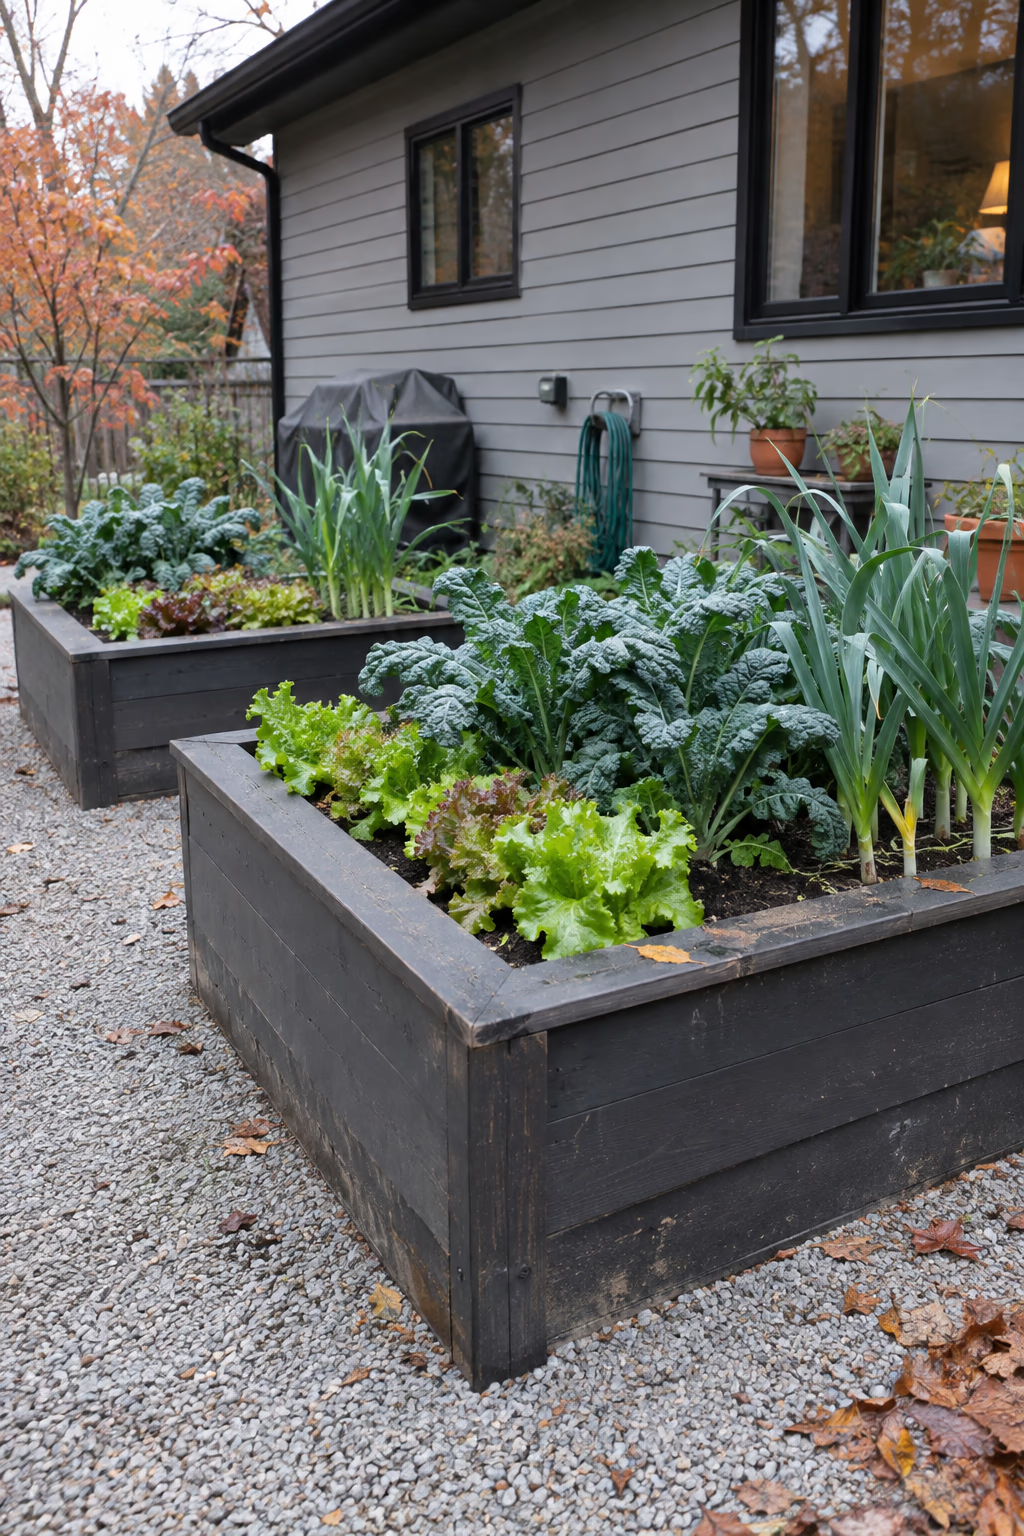
Dark frames make greens look brighter
Stain or paint the outside of wooden beds a deep charcoal, black, or slate gray, and pair them with pale gravel paths. Square-cut boards and flat caps keep the lines crisp, while lettuces, kale, and tall leeks pop against the dark sides.
Dark frames read as architectural and fit modern homes with black window trim or gray siding. They also hide soil splashes better than light finishes.
Use an exterior stain or paint on the outer faces only, and line the inside with plastic sheeting stapled above the soil line, or leave it bare, so finishes don’t contact the growing soil. Dark sides warm the soil a little, which helps in spring but can stress shallow crops in very hot climates.
7. Edge a Sunny Fence Line With Corten Steel Beds
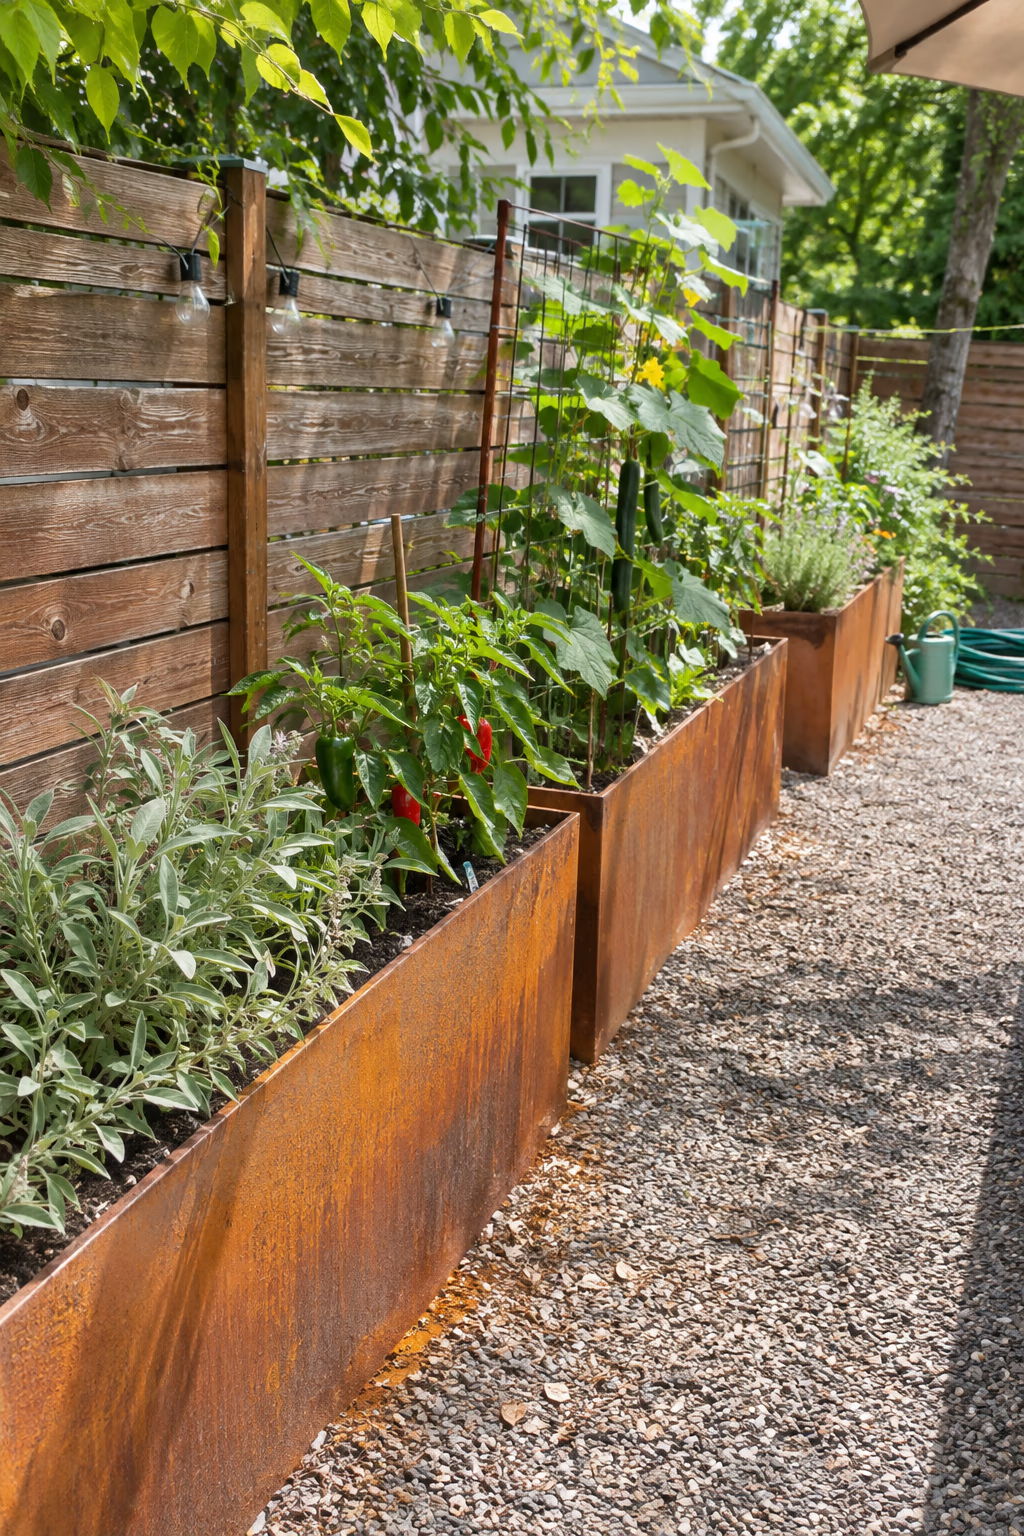
Rust-orange beds that need almost no upkeep
Weathering steel, often called Corten, forms a stable rusty patina that protects the metal underneath. Set a row of long, narrow steel beds 16 to 24 inches tall along a sunny fence and plant them with cucumbers, peppers, and herbs.
The warm orange-brown color looks great against cedar fencing, ornamental grasses, and silvery herbs like sage. Steel walls are thin, so you gain growing space compared with thick timber, and they won’t rot.
New Corten sheds rust as it weathers, which can stain concrete or pavers, so keep it on gravel or soil. The metal is pricier than wood and can get hot to the touch in full afternoon sun.
8. Build Classic Cedar Beds That Last for Years
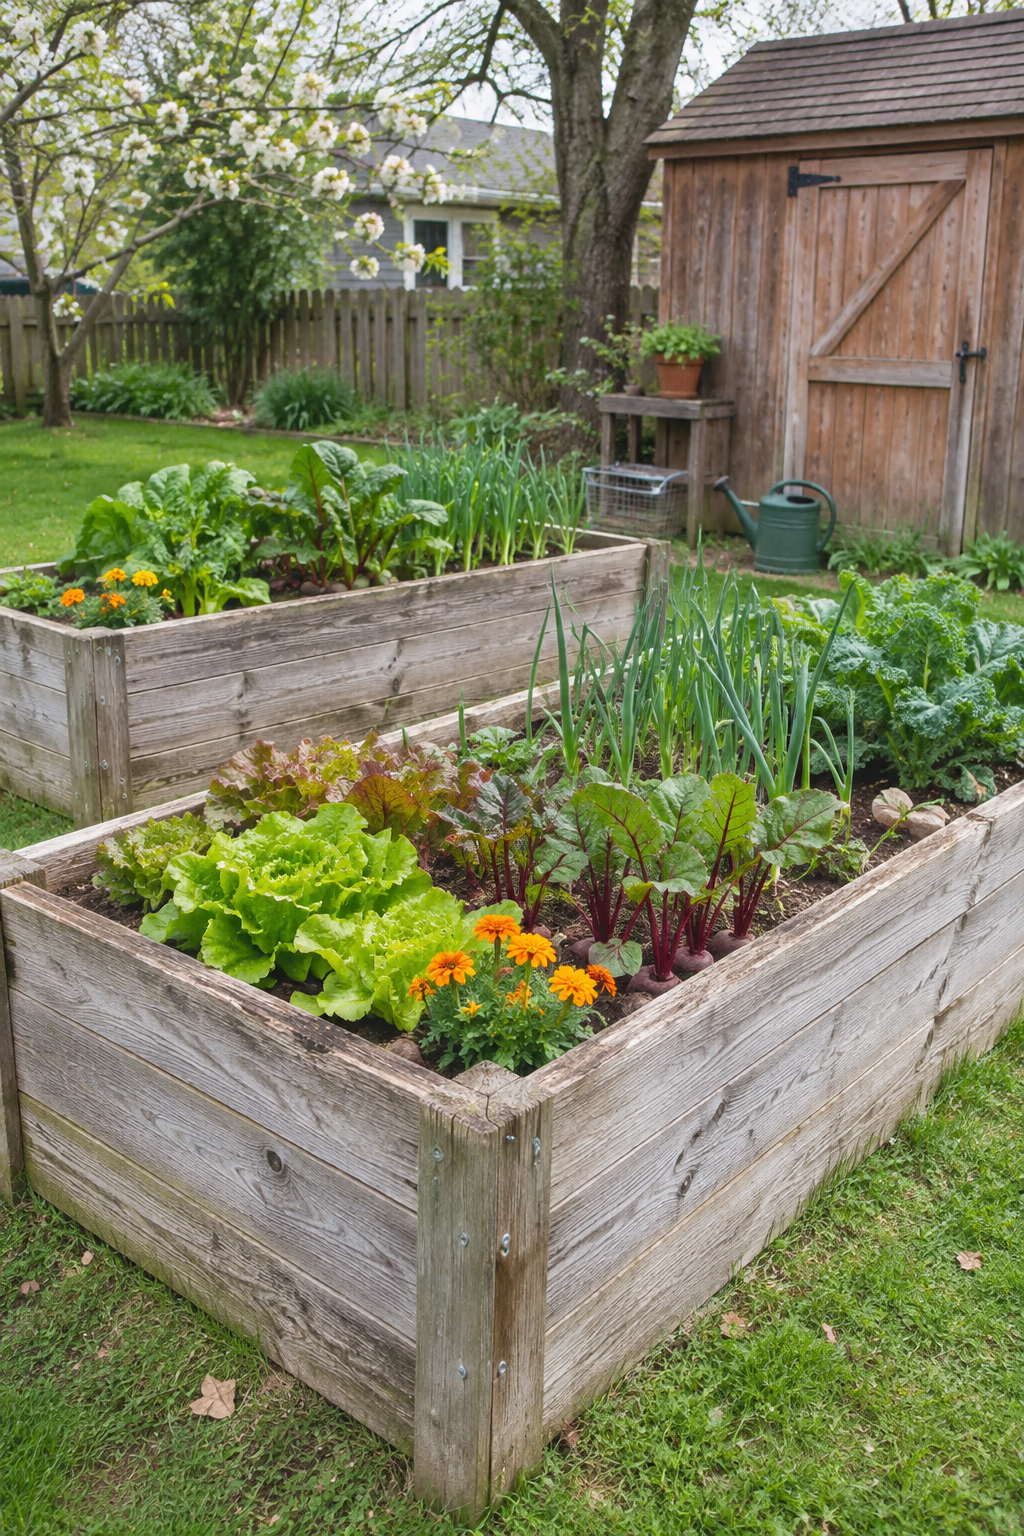
The most recommended wood for food beds
Untreated cedar is naturally rot resistant and safe for vegetables. Build standard beds 4 feet wide and 8 feet long from 2-by-10 or 2-by-12 boards, stacked two high for a depth of 18 to 24 inches, with 4-by-4 corner posts inside.
Cedar weathers to a soft silver gray that suits almost any home style. A 4-foot width lets you reach the center from both sides, and an 8-foot length makes good use of standard lumber.
Cedar costs more than pine, but well-built beds often last a decade or more. Use exterior screws rather than nails, and add a center brace on long sides so the boards don’t bow outward under the weight of wet soil.
9. Grow Peppers and Eggplant in a Galvanized Stock Tank
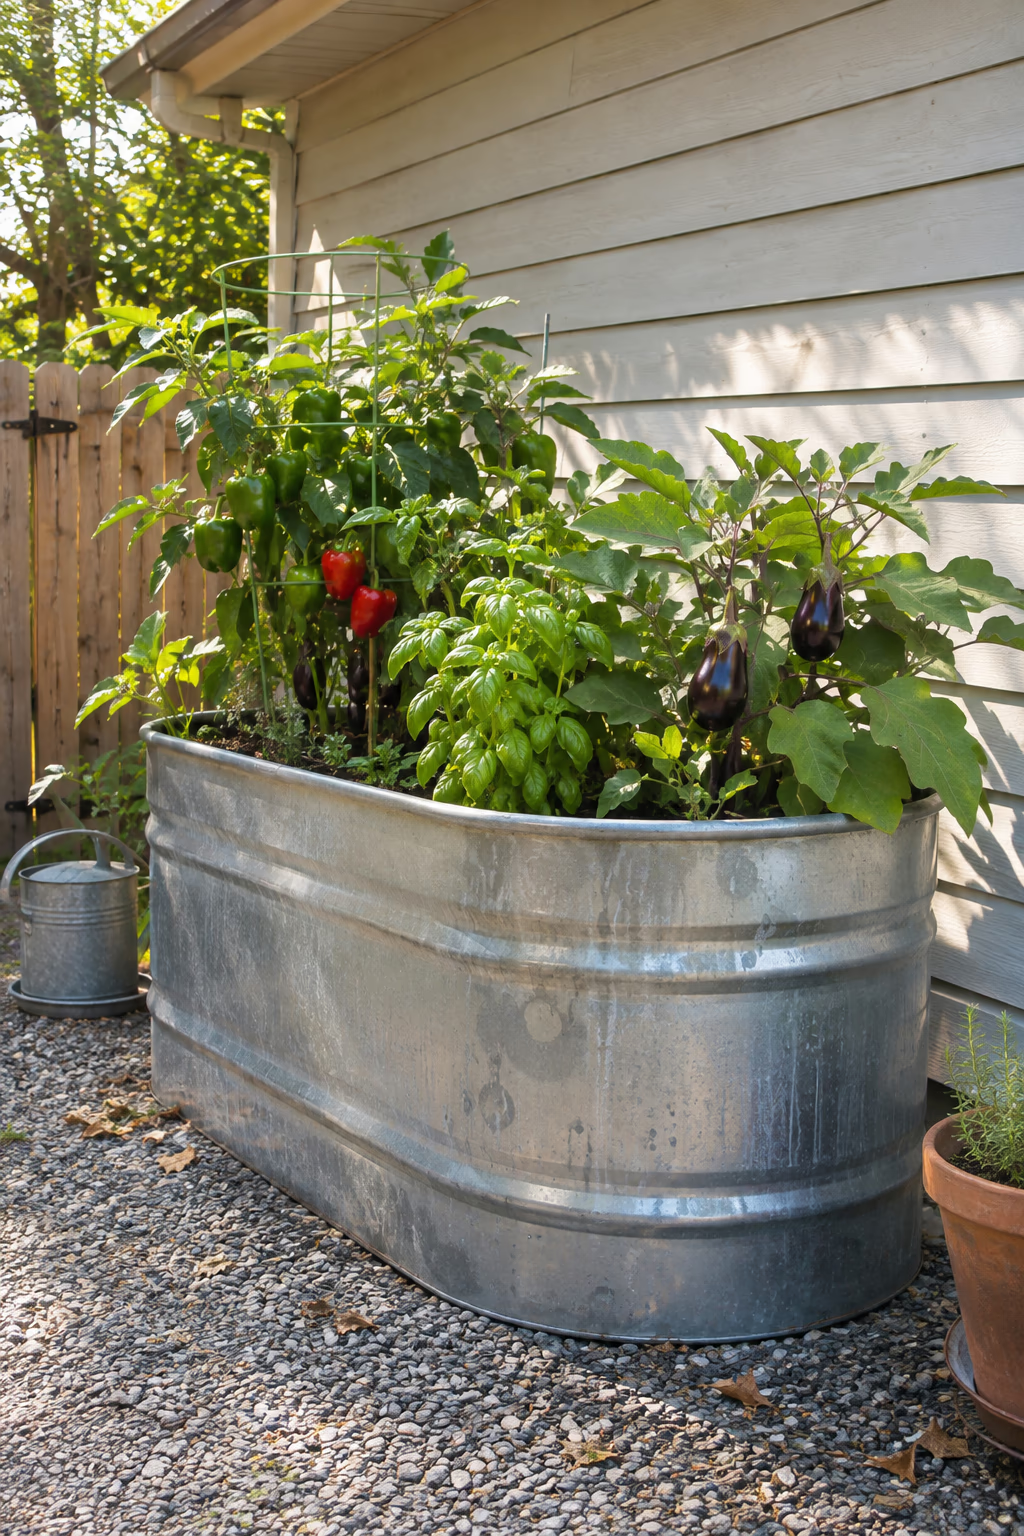
Heat-loving crops in a ready-made bed
An oval or round galvanized stock tank makes an instant raised bed about 2 feet tall. Drill several 1/2-inch drainage holes in the bottom, add a few inches of coarse wood chips, then fill with a blend of topsoil and compost.
Metal sides absorb heat, which suits peppers, eggplant, okra, and basil that love warm roots. The farmhouse look fits right into a gravel corner or next to a garage.
In hot Southern summers the tank can overheat soil, so give it afternoon shade or plant cool-season crops in spring and fall instead. Because it holds a lot of soil, set it in its final spot before filling.
10. Shape a Keyhole Bed Around a Compost Basket
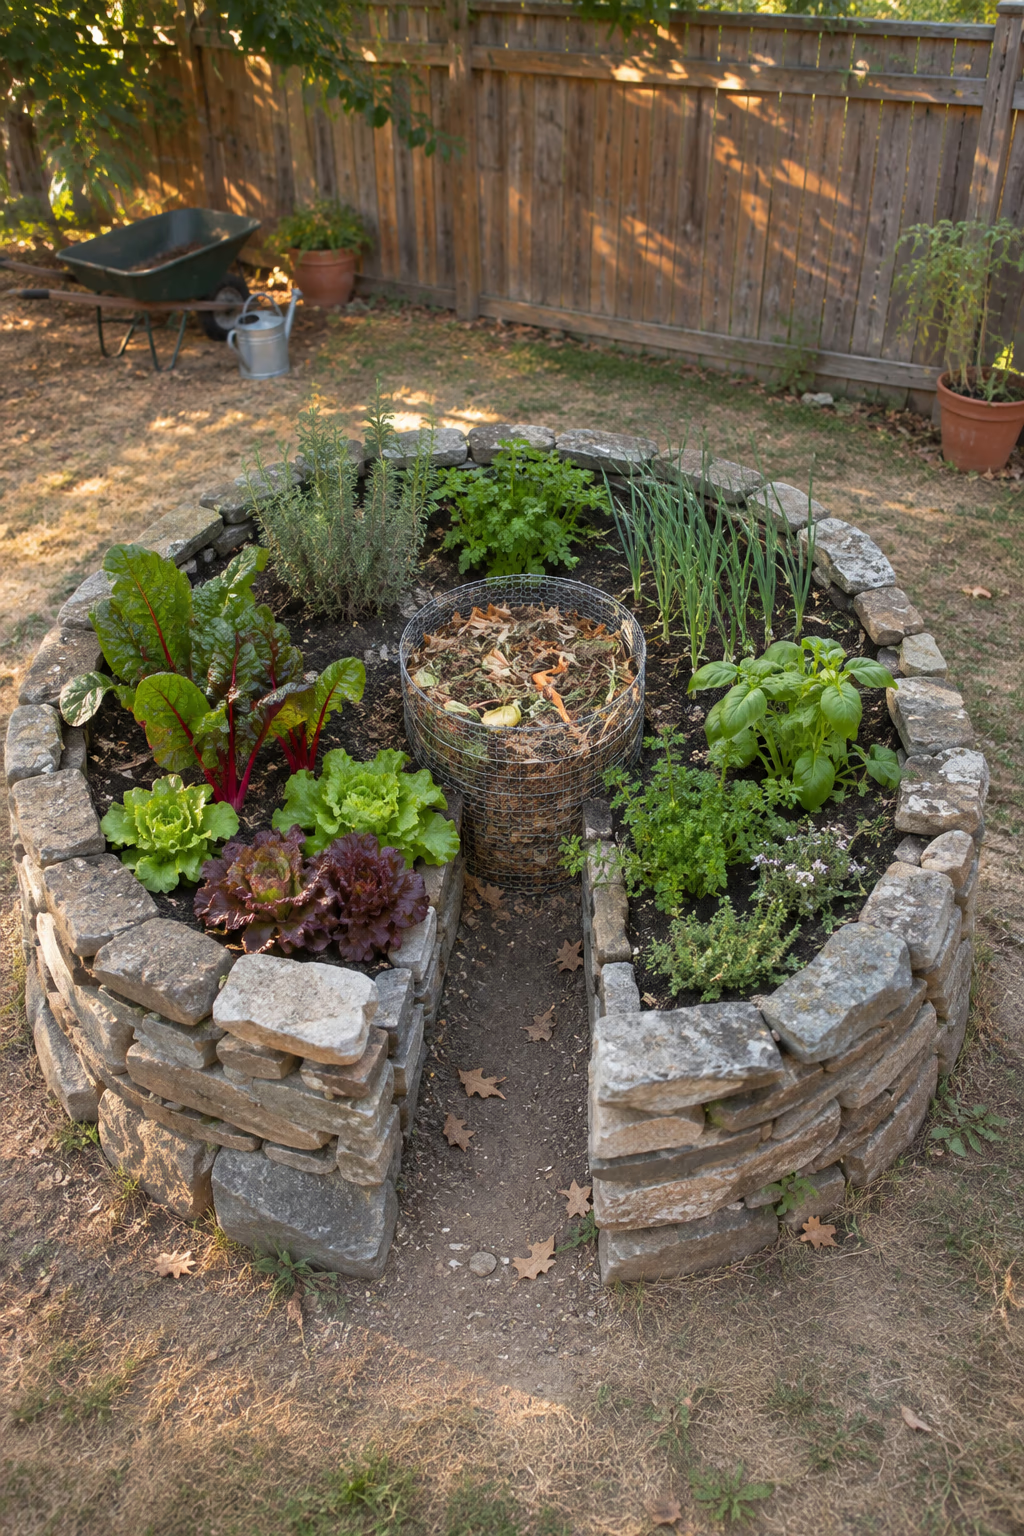
Feed the soil from the center
A keyhole bed is a round raised bed about 6 feet across with a narrow notch path leading to a wire or woven compost basket in the middle. Build the walls from stone, brick, or bent steel, roughly 2 to 3 feet tall.
Kitchen scraps and garden trimmings go into the central basket, and water poured into it carries nutrients outward into the surrounding soil. The notch lets you reach every part of the bed without stepping on it.
The design shines in dry climates where it concentrates water, but it works anywhere. Keep meat and dairy out of the basket to avoid odors and pests.
11. Keep a Salad Bed Steps From the Back Door
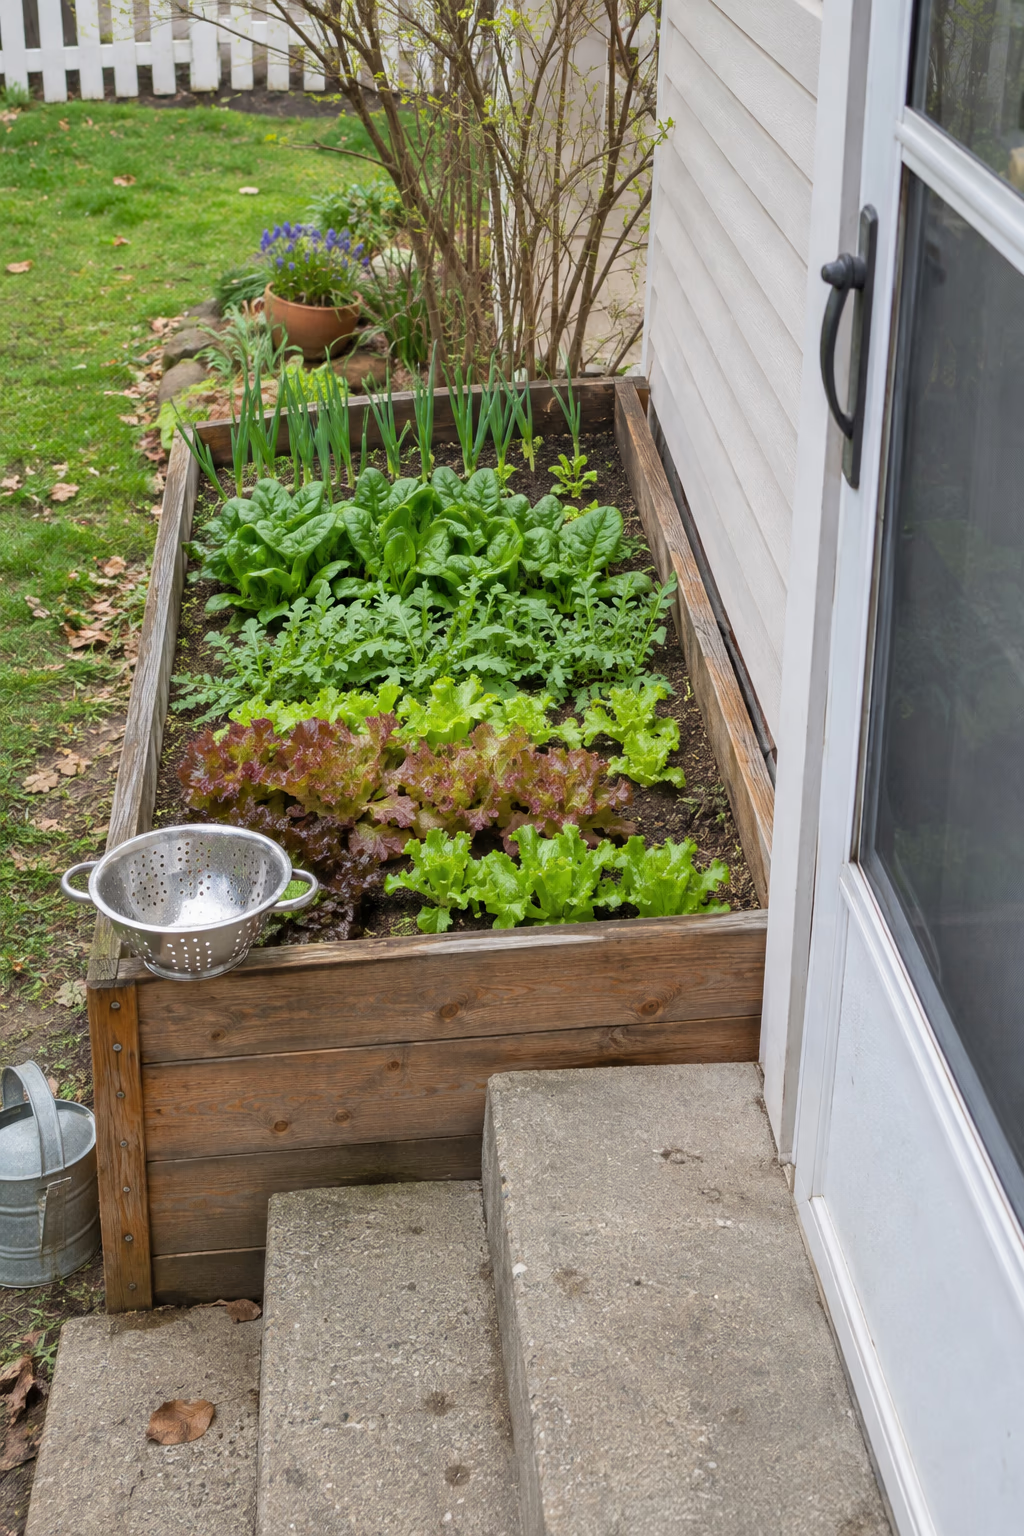
Fresh greens you’ll actually pick
Dedicate one small bed, about 3 by 6 feet, near the kitchen door to salad greens: loose-leaf lettuce, arugula, spinach, mizuna, and scallions. Sow short rows every two to three weeks so a fresh batch is always coming along.
Salad crops are quick, compact, and best picked minutes before eating. Having them close to the house means you’ll grab a handful for dinner instead of letting them bolt.
Most greens prefer cool weather and bolt in summer heat, so a spot with some afternoon shade extends the season. Switch to heat-tolerant options like New Zealand spinach or Malabar spinach in midsummer.
12. Stretch the Season With Hoops and Row Cover
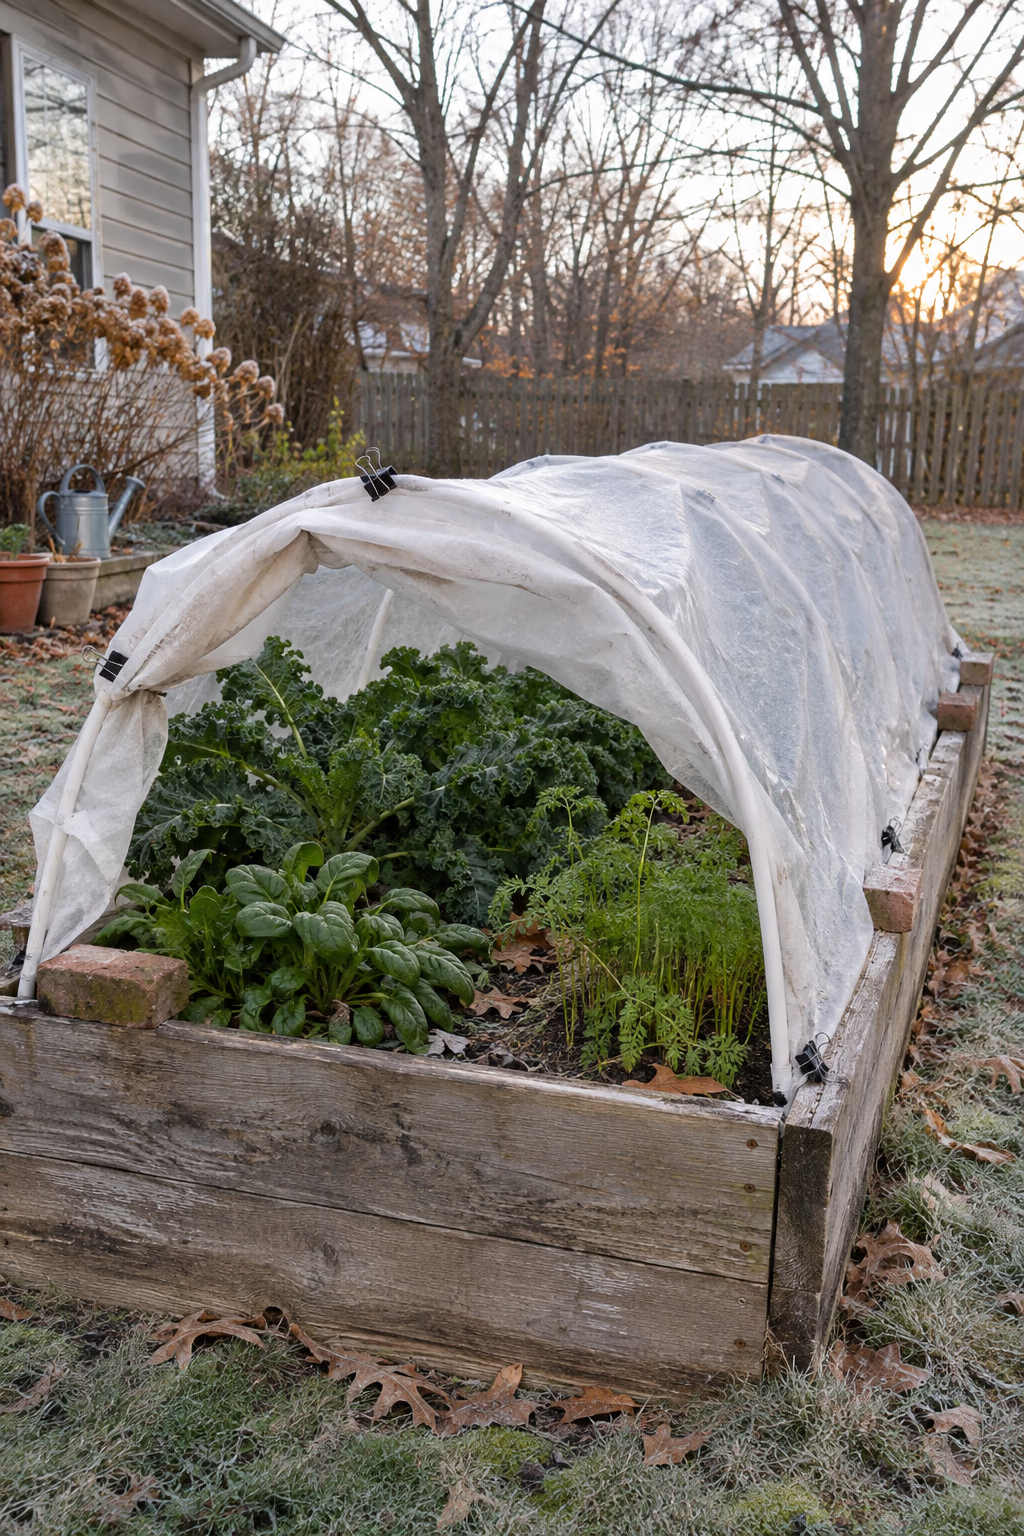
Harvest earlier in spring and later in fall
Bend 1/2-inch PVC pipe or heavy wire into arches and slip the ends into pipe clips screwed to the inside of the bed. Drape lightweight floating row cover over the hoops for frost protection or clear greenhouse film for extra warmth.
A covered bed can protect hardy crops like kale, spinach, carrots, and lettuce through light frosts, so harvests continue weeks past the usual end of the season. In summer, swap in insect netting to keep out cabbage moths.
Plastic-covered hoops heat up fast on sunny days, even in cold weather, so open the ends to vent. Weigh down or clip the edges firmly, because wind easily lifts loose covers.
13. Step Raised Beds Down a Sloped Yard
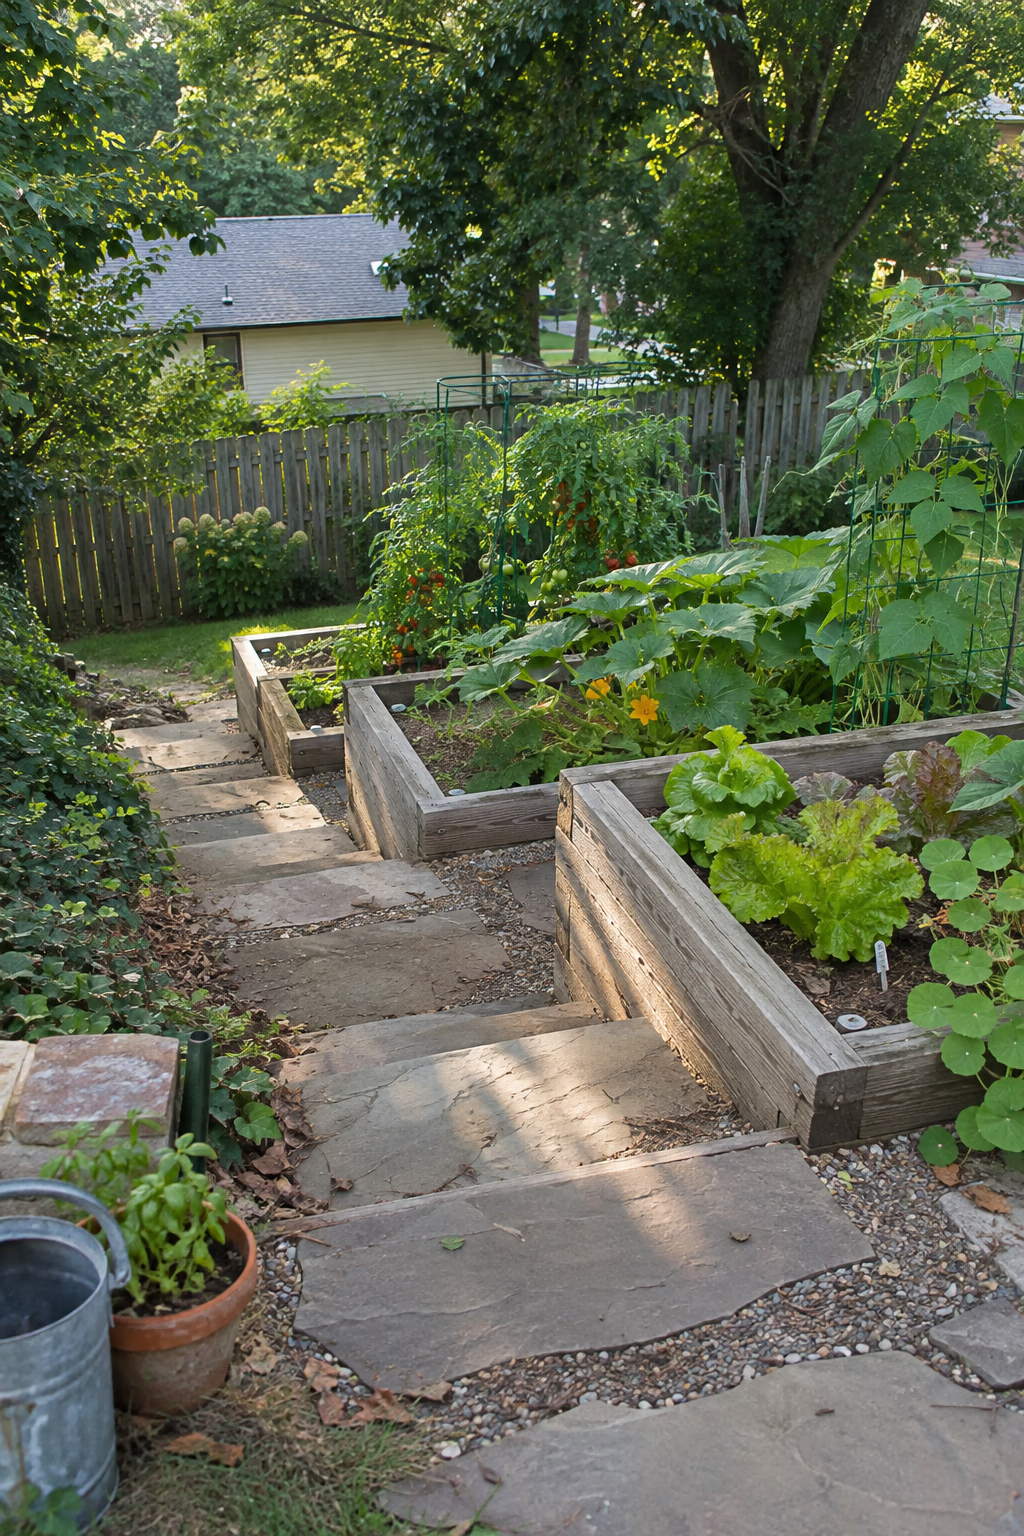
Make a hillside flat enough to farm
On a slope, build a series of raised beds that step downhill like stairs, each set level with a deeper side on the downhill end. Timber, stacked stone, or concrete block walls work, with short steps or a sloped path between levels.
Terracing turns an awkward slope into productive, level growing space, slows runoff, and keeps soil from washing away in storms. Each level also gets good sun when the slope faces south or west.
Walls taller than about 2 to 3 feet may need engineering or a permit, and all retaining walls need drainage gravel behind them. Call 811 before digging into any slope.
14. Plant a Three Sisters Bed of Corn, Beans, and Squash
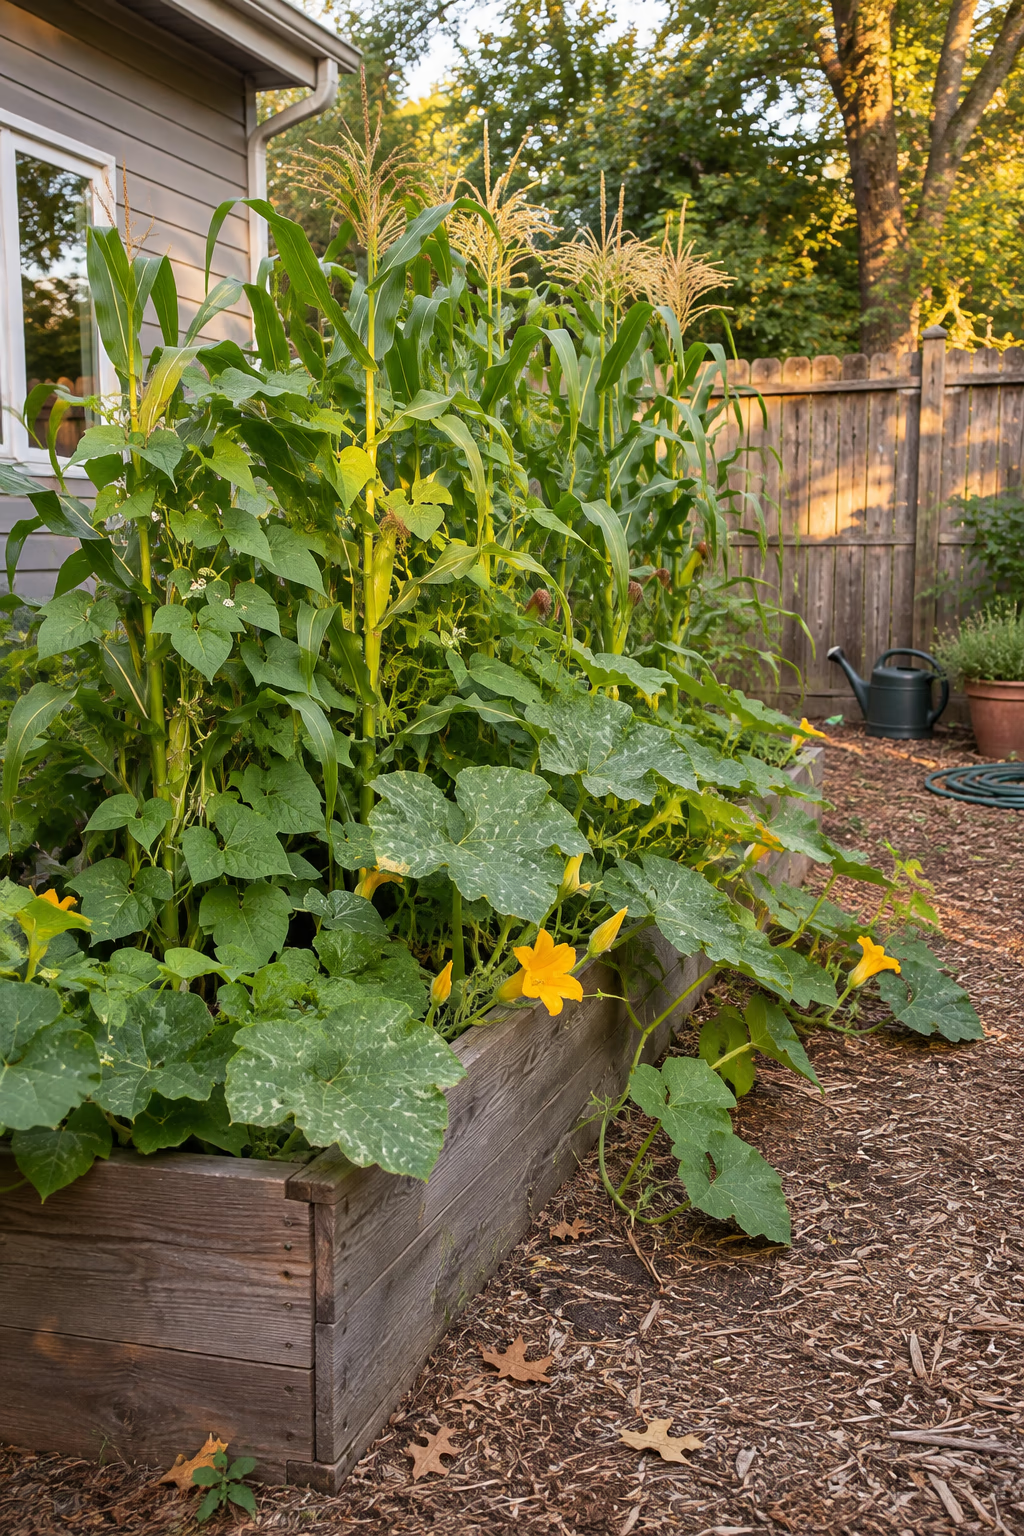
A traditional trio that supports itself
The Three Sisters method, developed by Indigenous farmers of North America, plants corn, pole beans, and winter squash together. In a 4-by-8-foot or larger bed, sow corn in small clusters, add beans at the base once the corn is about 6 inches tall, and let squash vines fill the edges.
Corn becomes the bean pole, beans climb without a trellis, and broad squash leaves shade the soil to hold moisture and smother weeds. It’s a great teaching bed for kids and a beautiful sight by late summer.
Corn needs to be planted in a block rather than a single row for good pollination, so give it at least a 4-by-4-foot patch. Squash vines roam, so expect them to spill over the sides into the path.
15. Stack Concrete Blocks Into a Sturdy Budget Bed
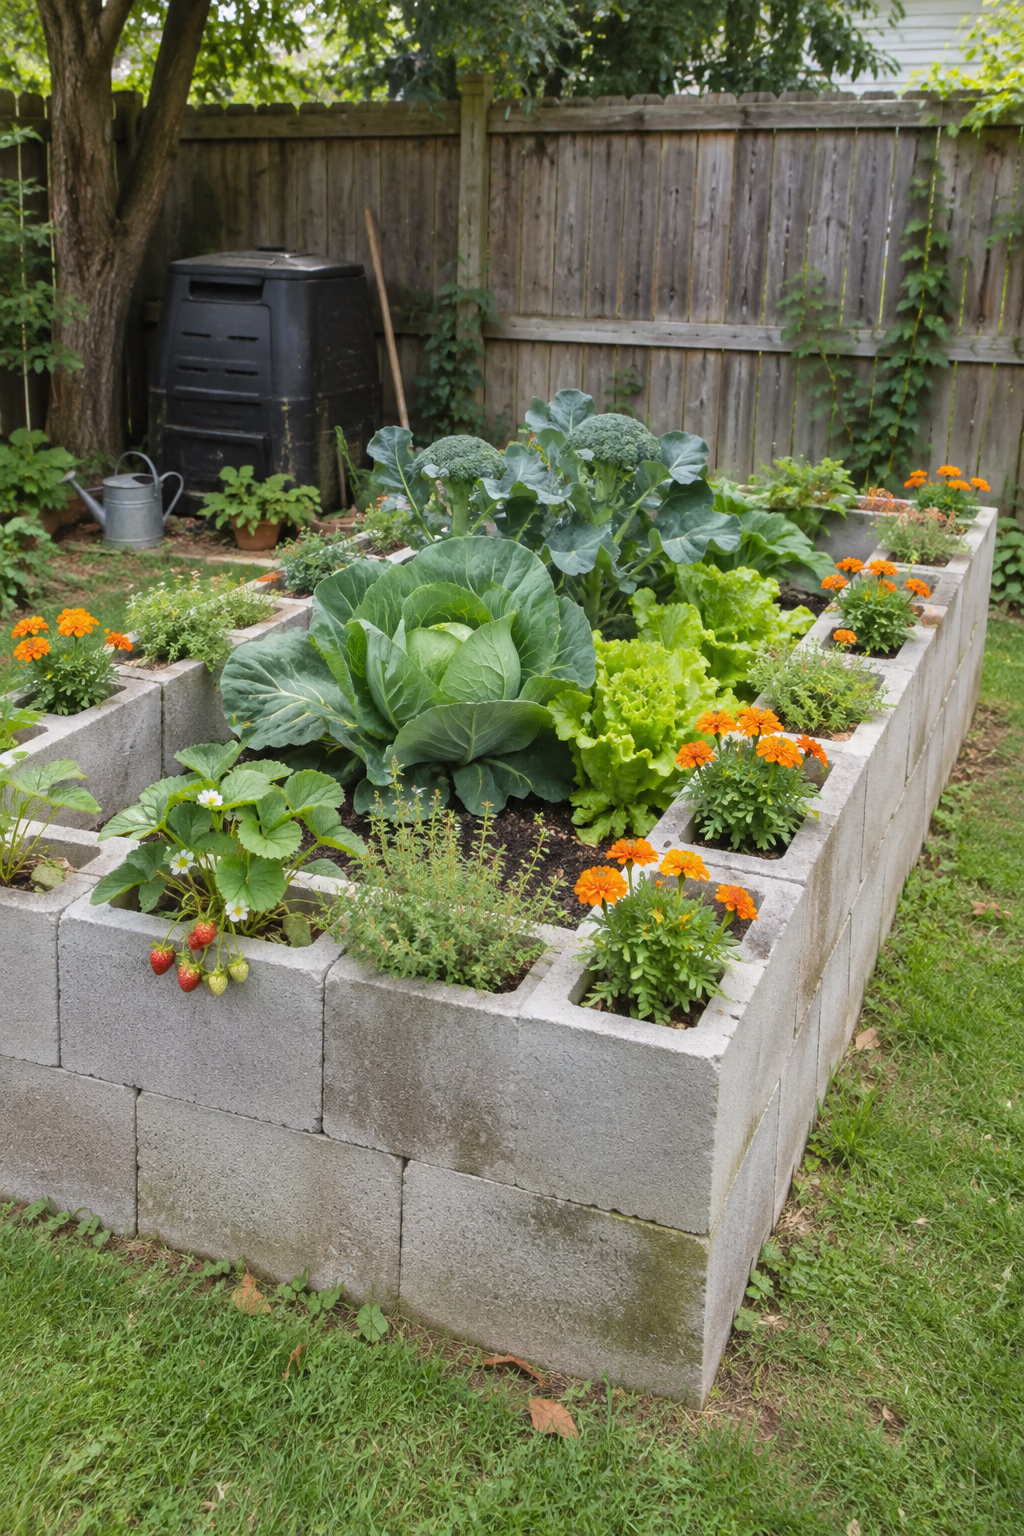
Low cost, no rot, and bonus planting pockets
Standard 8-by-8-by-16-inch concrete blocks stacked one or two courses high make an inexpensive, long-lasting bed with no tools beyond a level. Fill the hollow cores with soil and plant them with marigolds, thyme, or strawberries.
Blocks don’t rot or warp, and the wide tops double as a place to set a bucket or rest a knee. You can rearrange or expand the bed easily since nothing is fastened.
Use new standard concrete blocks rather than old cinder blocks of unknown origin. Level the ground carefully before the first course, as a tilted base makes the whole bed lean.
16. Build Extra-Deep Beds for Carrots and Potatoes
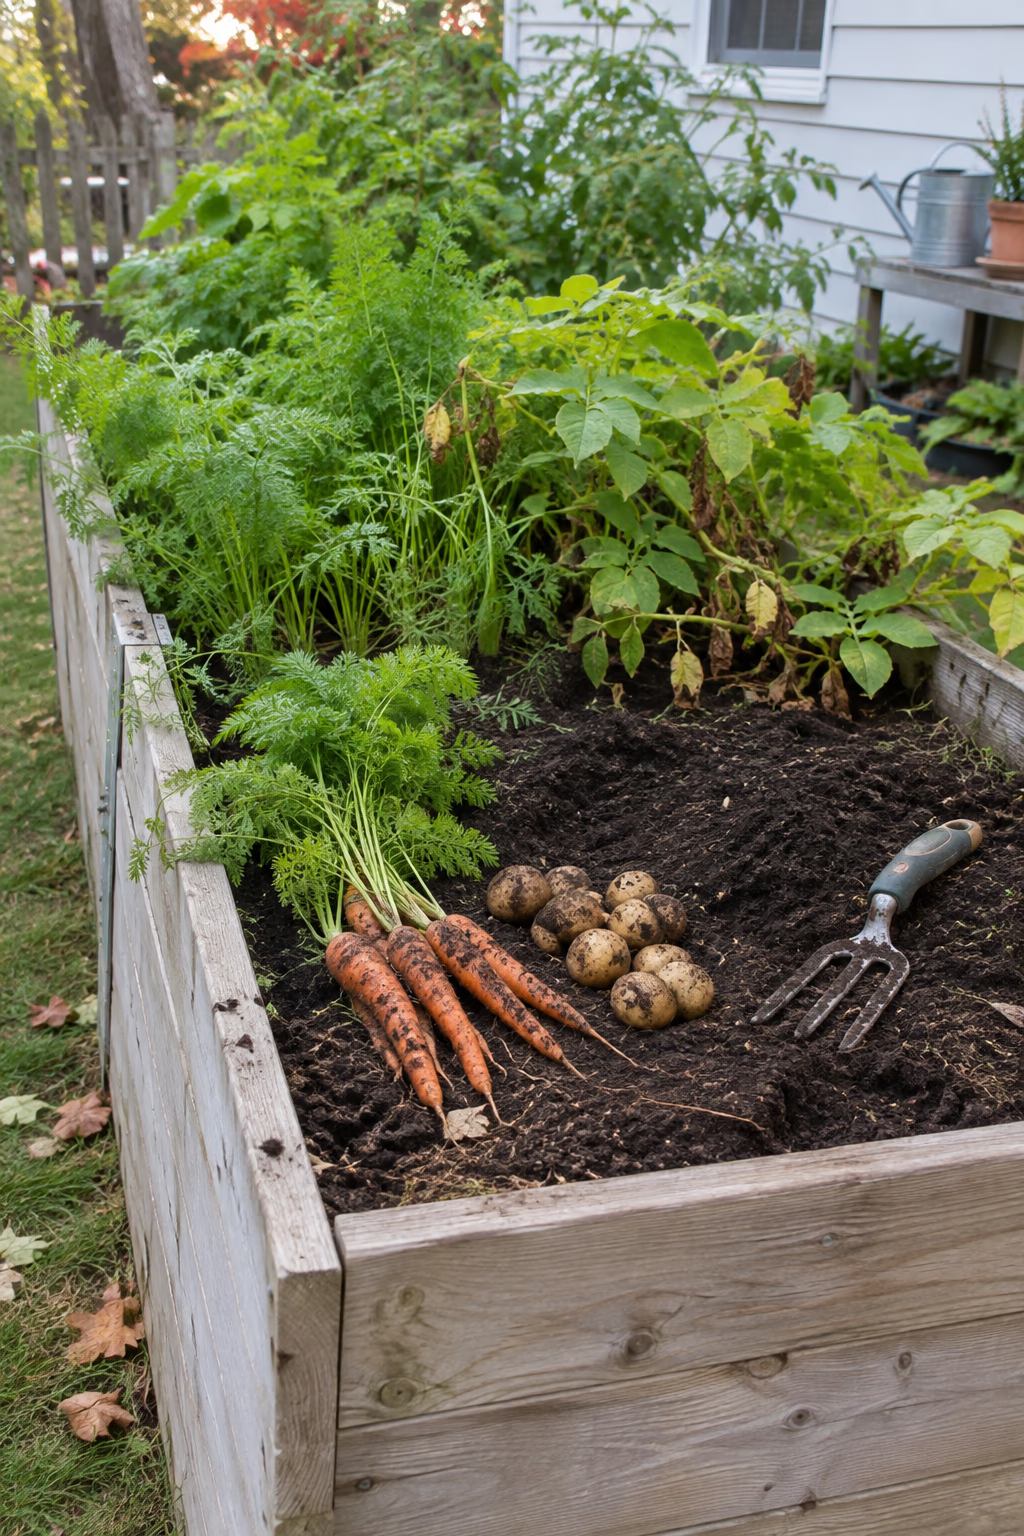
Room for long roots and big tubers
Most vegetables do fine in 12 inches of soil, but carrots, parsnips, daikon, and potatoes grow straighter and bigger in 18 to 24 inches of loose, stone-free mix. Build one bed deeper than the rest and reserve it for root crops.
Deep, fluffy soil lets roots grow straight down without forking, and harvesting becomes easy because you can loosen the soil by hand. Potatoes can be hilled with extra soil or straw inside the bed as they grow.
Deep beds take a lot of soil, so fill the lowest few inches of a very tall bed with coarse organic material. Skip fresh manure in root beds, as it can cause forking and hairy roots.
17. Weave Willow Sides Around a Rustic Bed
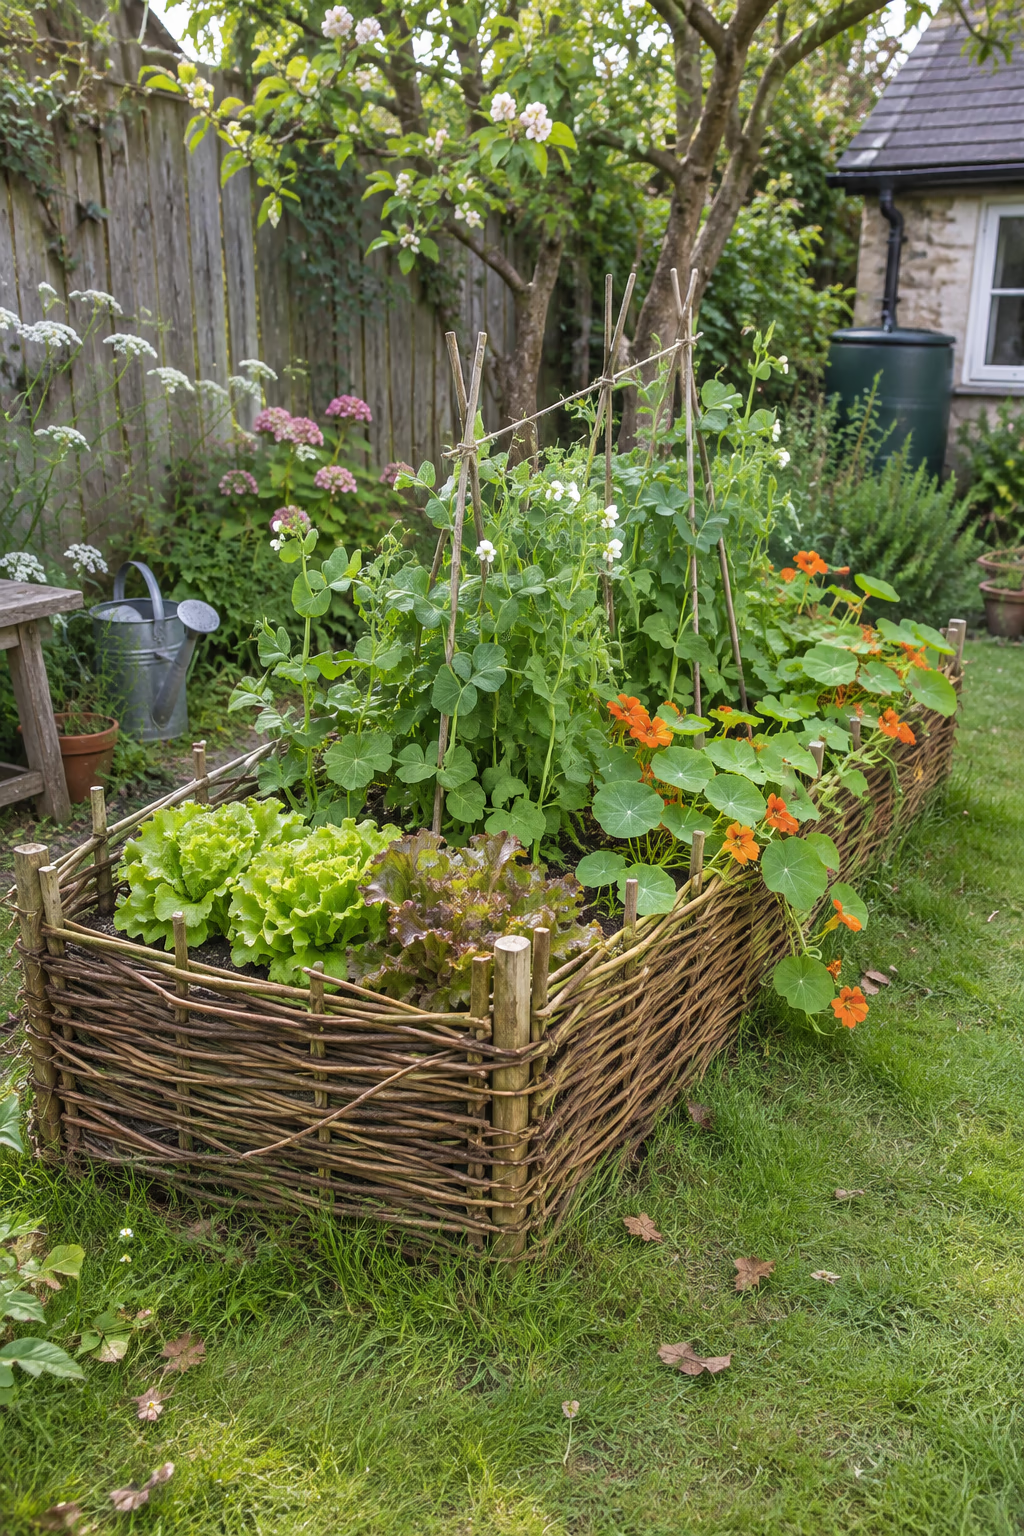
Cottage-style texture for a small plot
Drive sturdy stakes into the ground every 12 inches around the bed outline, then weave flexible willow or hazel rods in and out to build sides 12 to 18 inches high. Line the inside with burlap or landscape fabric to hold the soil.
Woven sides give a vegetable bed the handmade charm of an old kitchen garden and look lovely with peas, lettuce, and nasturtiums. Prewoven panels are also available if you’d rather skip the weaving.
Willow and hazel break down in a few years in contact with damp soil, so treat this as a temporary or decorative bed. Fresh willow rods can sprout, so use dried rods if you don’t want a hedge.
18. Fill a Tall Bed Hugelkultur-Style With Old Logs
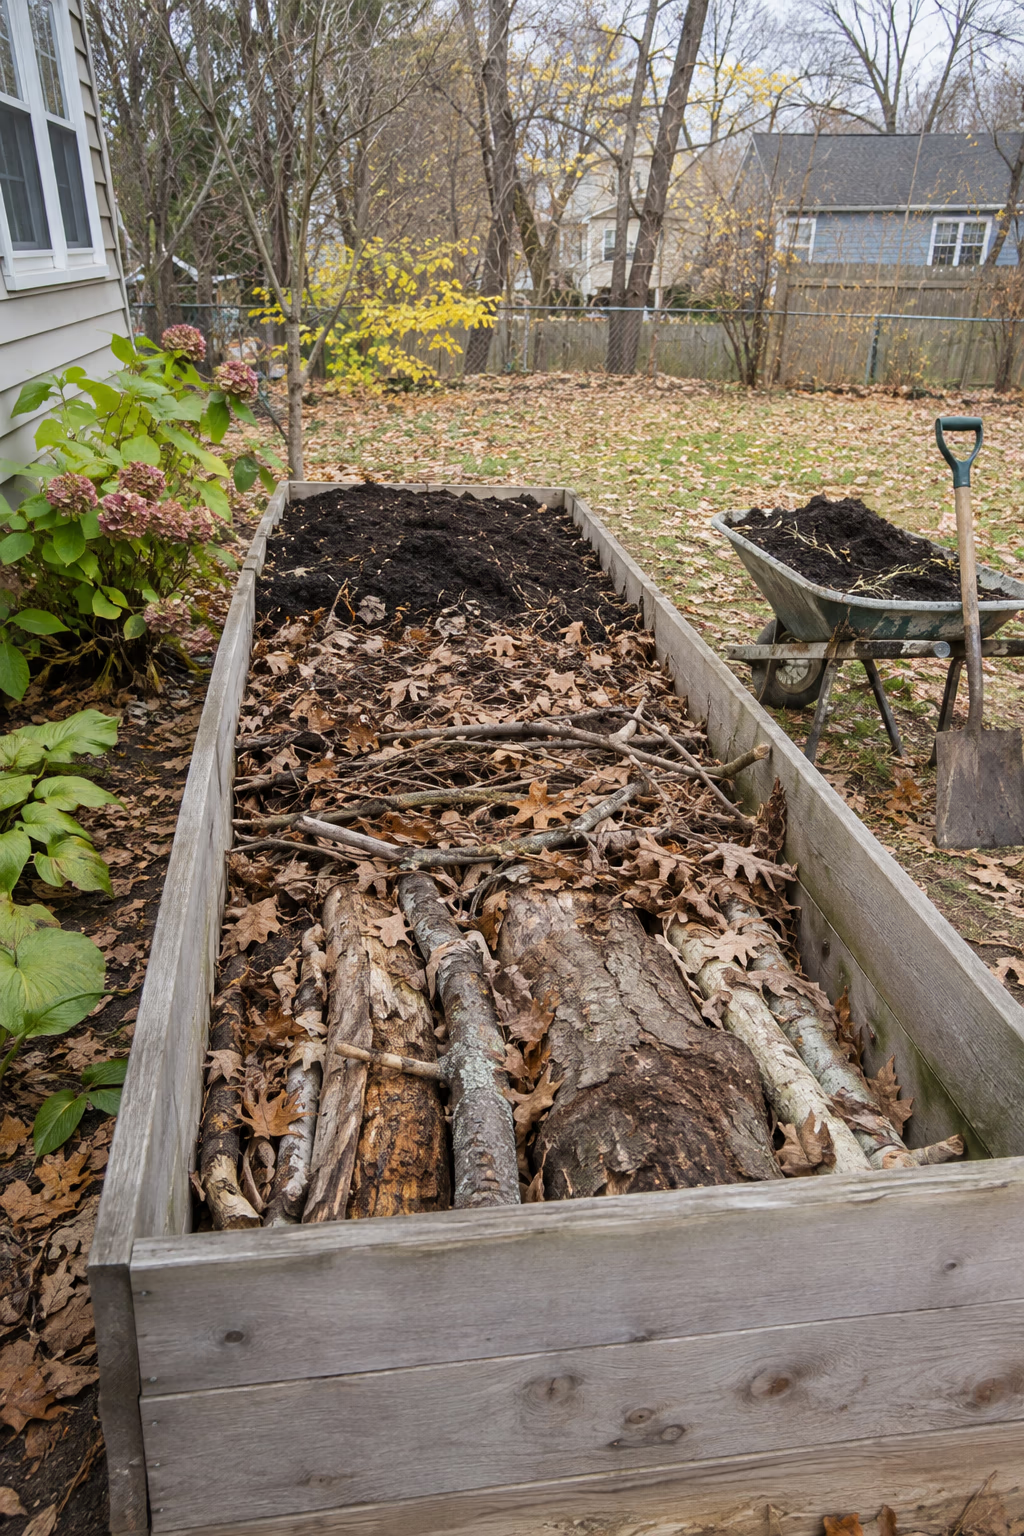
Save on soil and build moisture-holding layers
Before filling a tall bed, lay old logs and thick branches across the bottom, then add smaller sticks, leaves, grass clippings, and finally 8 to 12 inches of soil and compost on top. The buried wood slowly breaks down like a sponge.
This method uses yard waste you already have and cuts the amount of purchased soil needed for a deep bed. As the wood rots, it holds water and feeds soil life for years.
Avoid black walnut, which releases a compound harmful to many vegetables, and treated or painted lumber. Expect the soil level to settle, and top it up with compost each spring.
19. Plant Wide Beds in Tight Block Spacing
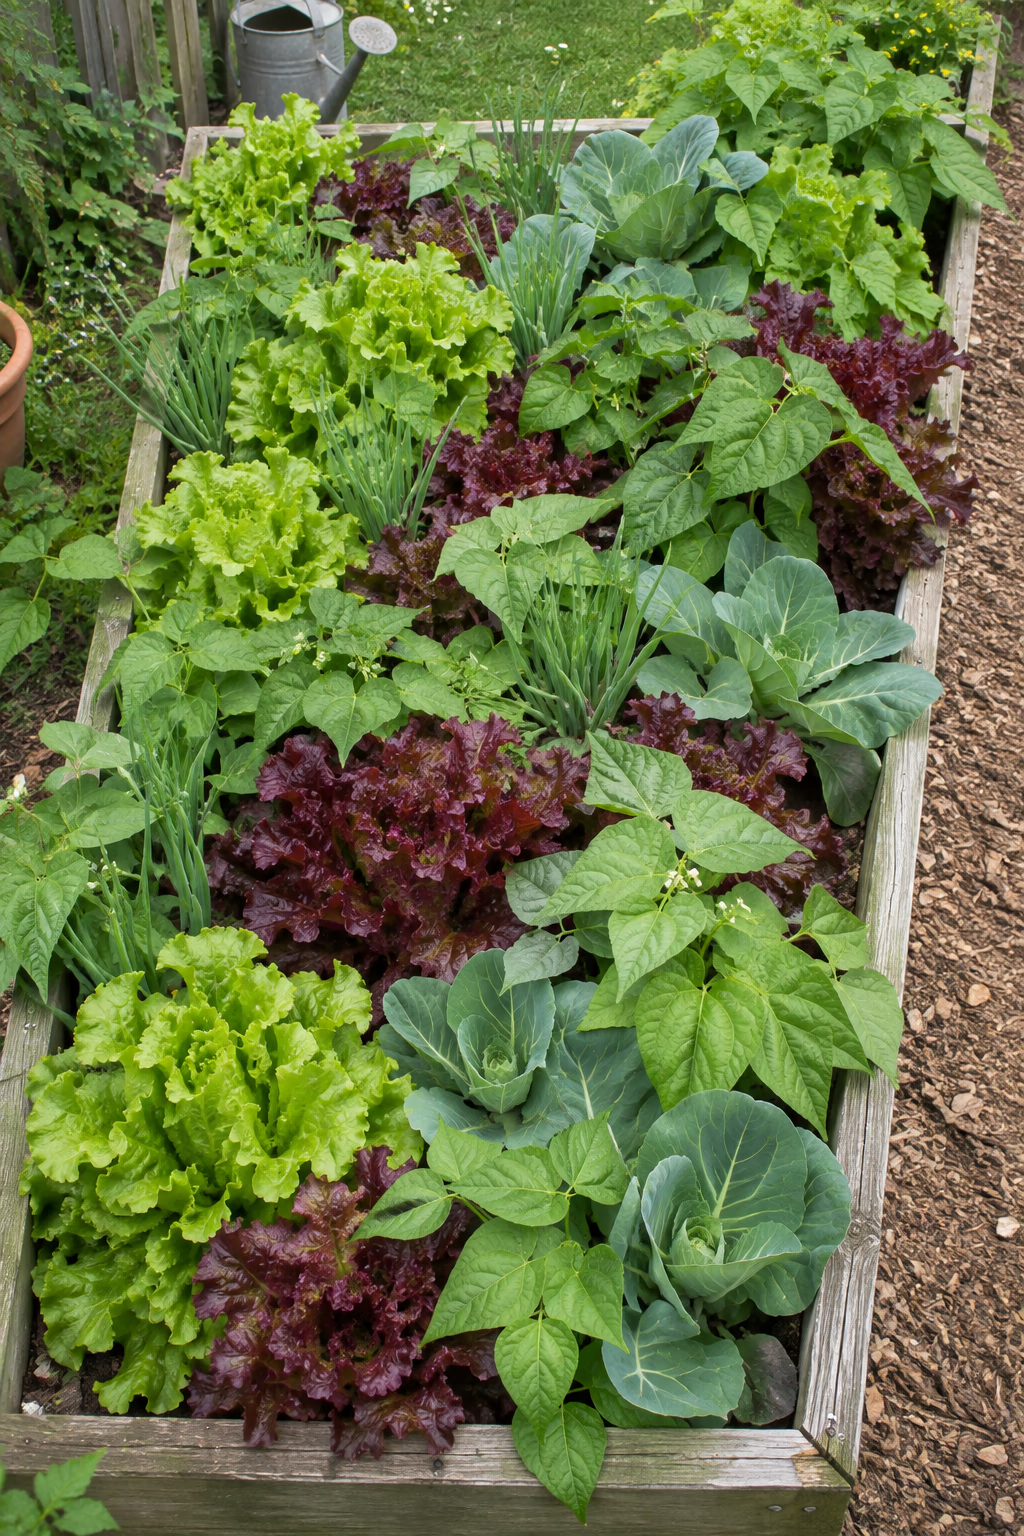
More food and fewer weeds in the same space
Instead of planting in single rows with gaps between them, fill a raised bed edge to edge in an even, staggered pattern so mature leaves just touch. Onions might go 4 inches apart, bush beans 6 inches, and cabbage 15 to 18 inches.
Because you never walk in a raised bed, there’s no need for rows. Close spacing shades the soil, holds moisture, and crowds out weeds, so you get more harvest per square foot.
Dense planting demands rich soil, so add 1 to 2 inches of compost each season. Leave enough space for airflow on disease-prone crops like squash and tomatoes.
20. Run Drip Lines Beneath the Mulch
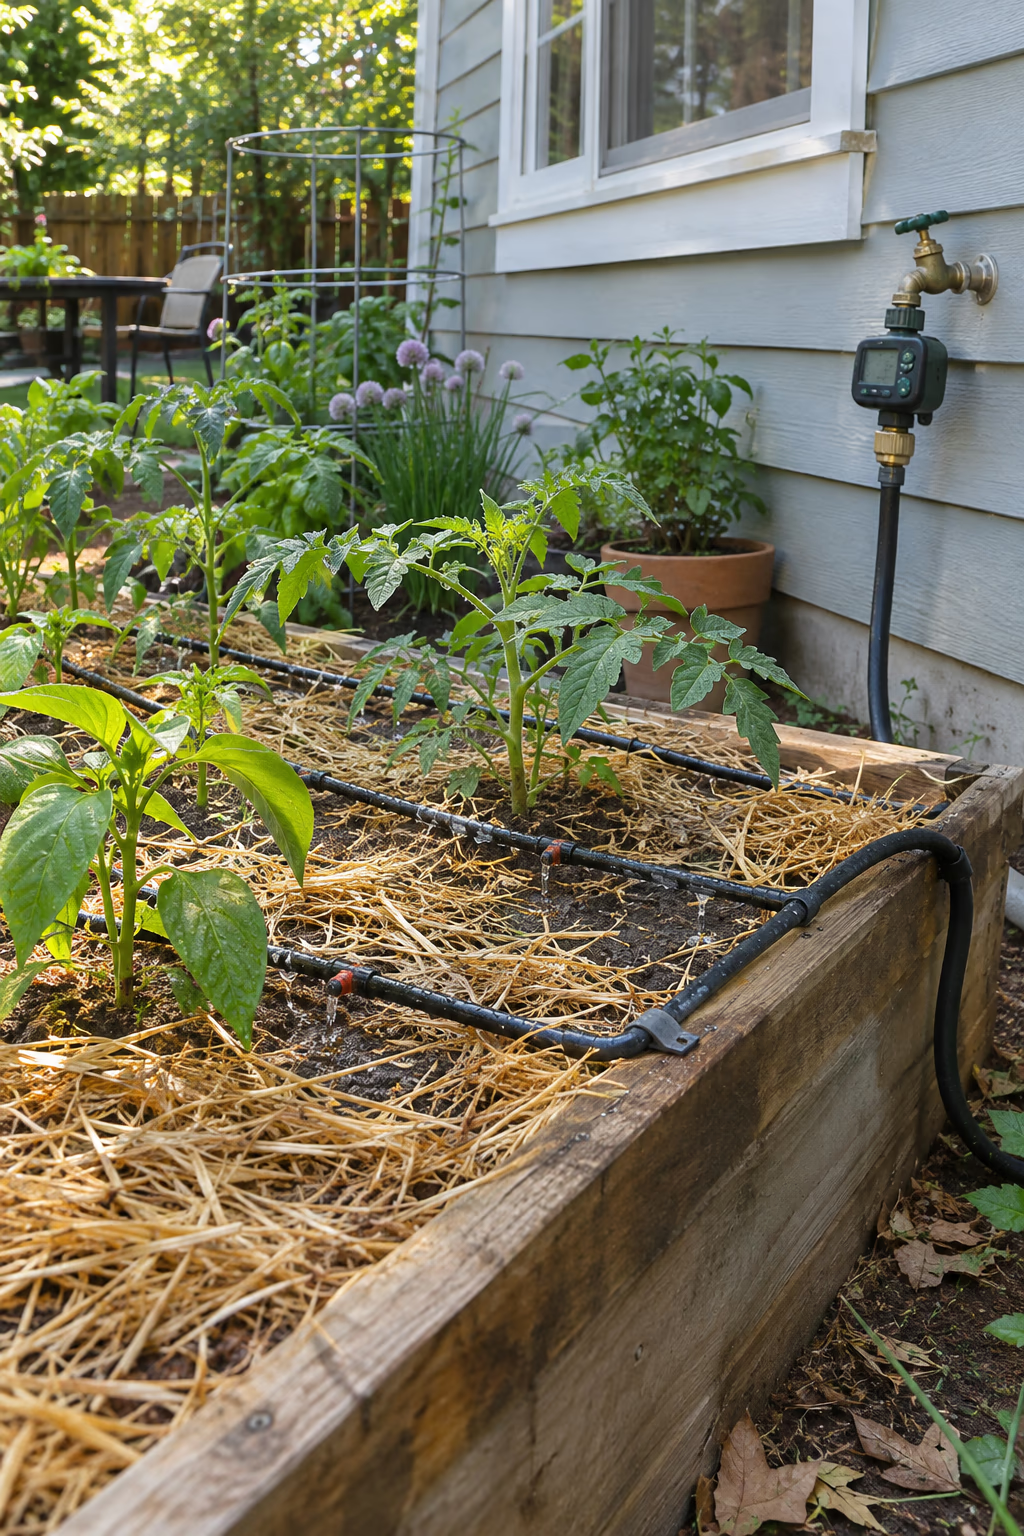
Steady water with almost no effort
Lay drip tubing with built-in emitters every 12 inches in loops or parallel lines across each bed, connect it to a hose-end timer, and cover the lines with straw or shredded leaf mulch. A typical bed needs about 1 inch of water per week, more in hot weather.
Raised beds dry out faster than in-ground gardens, and drip irrigation puts water right at the roots while keeping leaves dry, which helps prevent fungal diseases. A timer means vacations no longer kill the garden.
Add a pressure regulator and a filter at the faucet, as most drip systems need lower pressure than household water. Drain or bring in the lines before a hard freeze in cold climates.
21. Line Bed Bottoms With Hardware Cloth
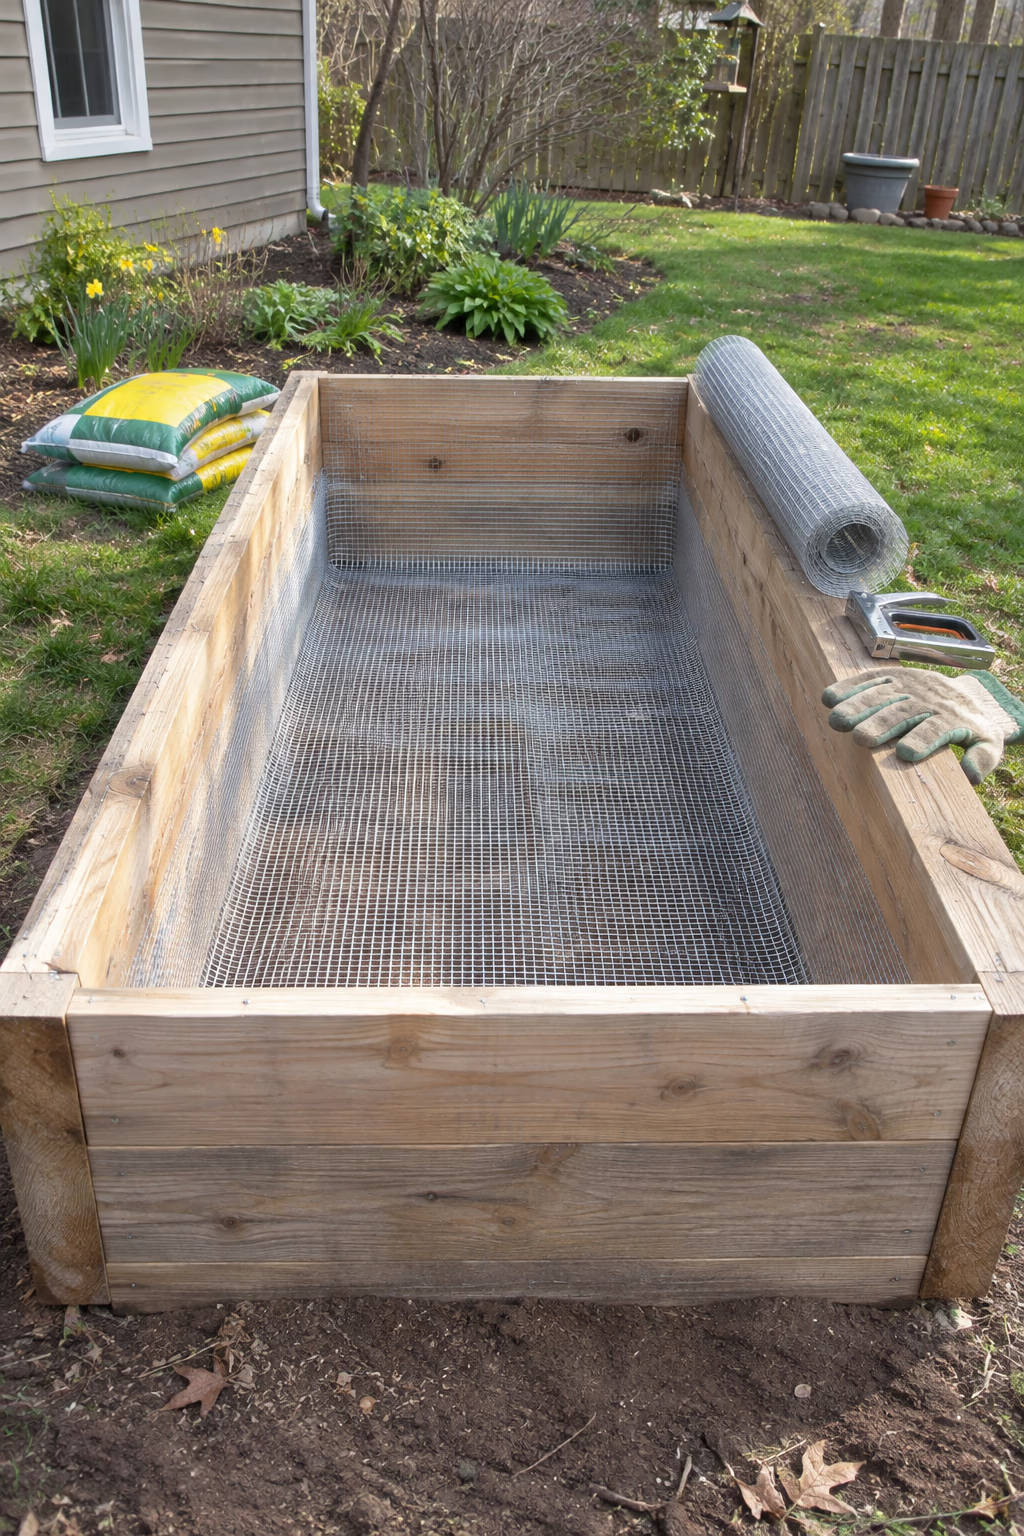
Stop gophers and moles from below
Before filling a new bed, staple galvanized hardware cloth across the entire bottom of the frame and run it a few inches up the inside walls. Mesh with 1/2-inch openings stops gophers, and 1/4-inch mesh is better where voles are a problem.
In areas with burrowing animals, a single gopher can wipe out a bed of carrots or lettuce overnight. A mesh floor is the most reliable fix and adds little to the cost of a new bed.
Lay the mesh before adding soil, since retrofitting a full bed is a big job. Galvanized mesh eventually rusts, so expect to replace it when you rebuild the bed.
22. Rotate Crop Families Through Four Numbered Beds
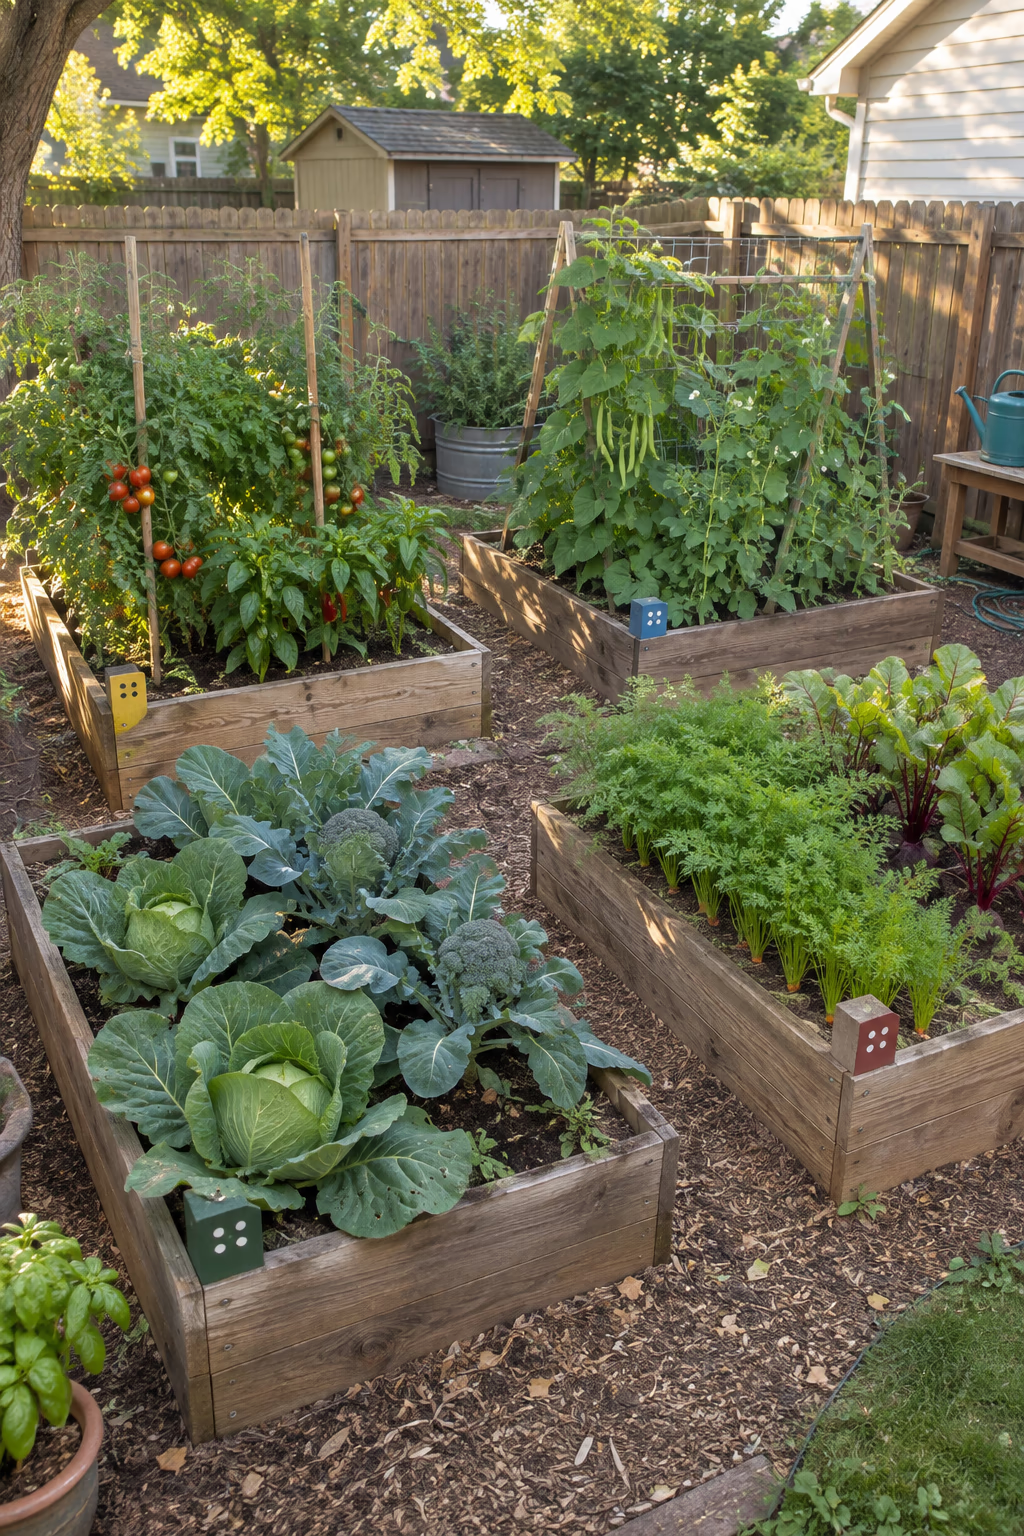
Healthier soil with a simple yearly plan
Set up four beds and assign each to a crop family: tomatoes and peppers, beans and peas, cabbage relatives, and root crops. Each year, move every group one bed over, so no family grows in the same soil more than once every four years.
Rotation helps break the cycle of soil-borne diseases and pests, and it balances nutrients, because beans and peas leave nitrogen behind for the leafy crops that follow. Small painted markers on each bed’s corner make the order easy to remember.
Keep a simple notebook or phone photo of each year’s layout. Rotation reduces problems but won’t cure severe infestations, so pull and trash diseased plants promptly.
23. Frame Simple Beds From Untreated Pine Boards
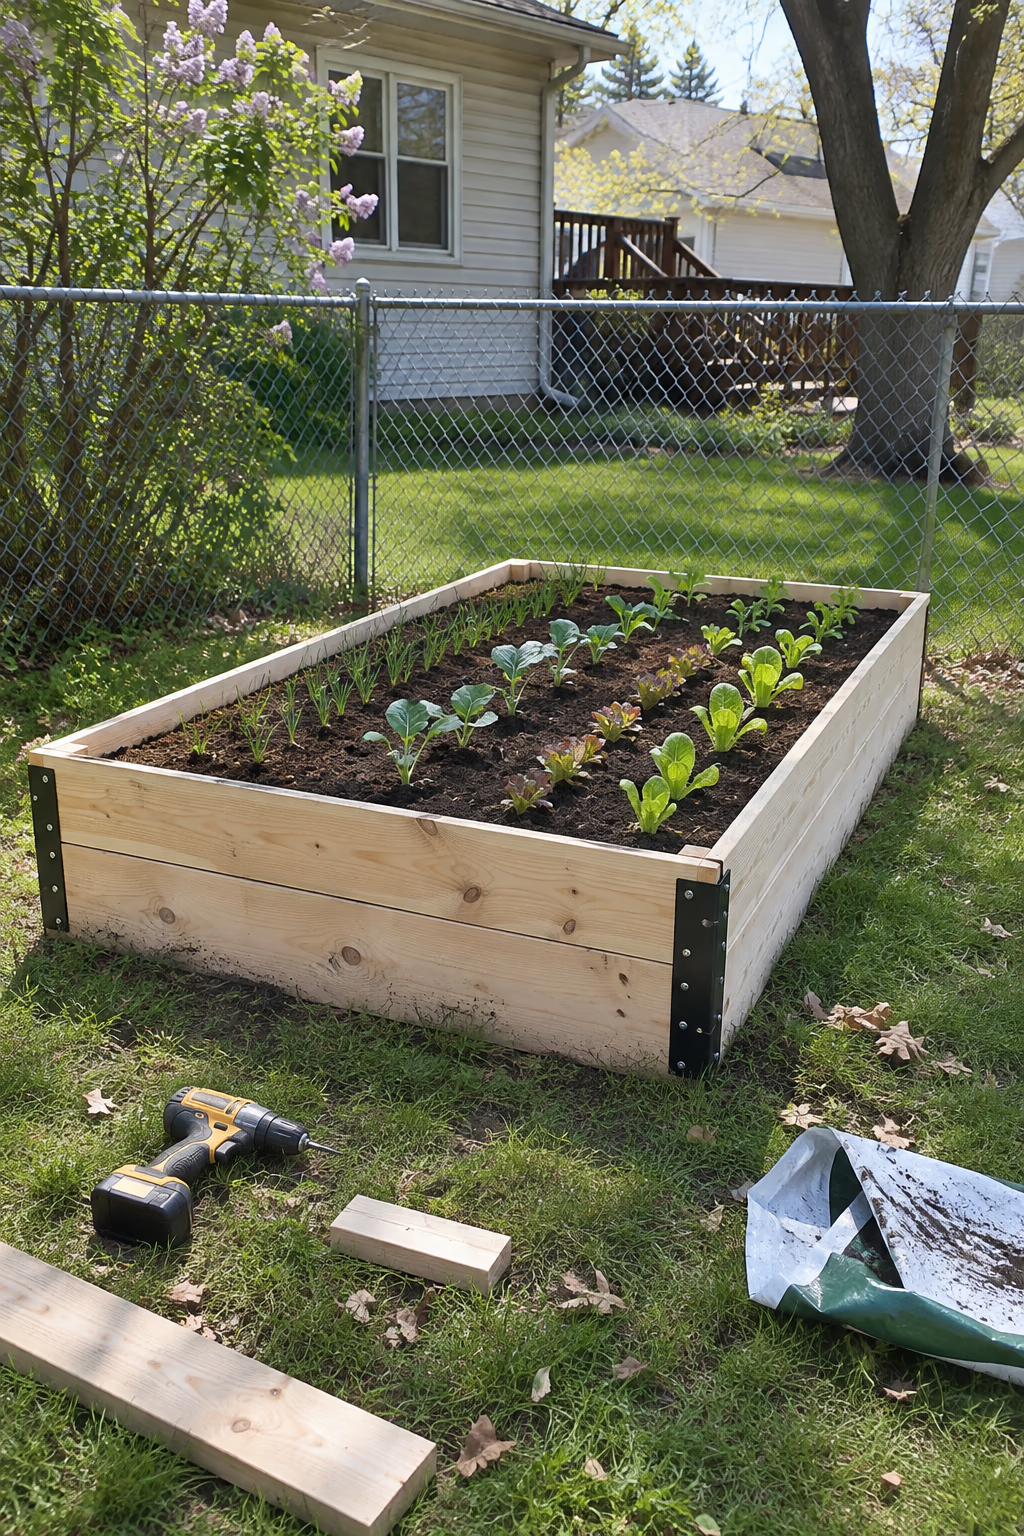
The cheapest way to start growing this season
Build a basic bed from untreated pine or Douglas fir 2-by-8 or 2-by-10 boards joined with metal corner brackets or exterior screws. A single 4-by-8-foot bed can be cut and assembled in an afternoon with simple tools.
Pine is widely available and costs far less than cedar, so you can build several beds for the price of one. It’s a smart way to test garden locations before investing in permanent materials.
Untreated pine usually lasts three to five years before rotting, depending on your climate. Thicker boards last longer, and you can reuse the brackets when it’s time to replace the wood.
How to Plan Your Raised Vegetable Garden
A raised vegetable garden is easiest to maintain when the site, size, and soil are right from the start. A few planning steps now will save years of frustration.
- Follow the sun. Most vegetables need at least 6 to 8 hours of direct sun. Watch your yard for a full day before choosing a spot, and run long beds north to south when possible so plants don’t shade each other.
- Keep beds reachable. Limit width to about 4 feet when you can reach from both sides, or 2 to 3 feet against a fence or wall, so you never have to step on the soil.
- Plan paths for wheelbarrows. Leave at least 2 feet between beds, and 3 feet for main paths, so you can roll in compost and kneel comfortably.
- Use a good soil blend. Fill with a mix of quality topsoil and compost rather than straight bagged potting mix or bare yard dirt, and top up with compost every year.
- Put water nearby. Site beds within reach of a hose spigot or plan a drip line, since raised beds dry out faster than in-ground plots.
- Check the rules and the ground. Review HOA guidelines and local codes for front-yard beds, fences, or greenhouses, and call 811 before digging deep footings or posts.
Frequently Asked Questions
How deep should a raised vegetable bed be?
Twelve inches of soil works for most vegetables, including lettuce, beans, peppers, and herbs. For carrots, potatoes, and other root crops, or if the ground beneath is compacted or poor, aim for 18 to 24 inches.
What is the best material for a raised vegetable garden?
Untreated cedar is a popular, long-lasting choice that’s safe for food crops. Galvanized or weathering steel, concrete block, and stone also work well. Untreated pine is the budget option but will need replacing within a few years.
What should I put in the bottom of a raised garden bed?
In most cases, nothing but soil is needed, as roots benefit from reaching the ground below. Add hardware cloth if burrowing animals are an issue, cardboard to smother grass or weeds, or logs and branches in very tall beds to save on soil.
Which vegetables grow best in raised beds?
Almost any vegetable does well. Lettuce, spinach, radishes, carrots, beans, tomatoes, peppers, onions, and herbs are especially easy. Space-hungry crops like corn, pumpkins, and melons can grow in raised beds too, but they need large beds or room to spill over.
How much does it cost to build a raised vegetable garden?
Costs vary with materials and size. A simple DIY pine bed plus soil can cost under a hundred dollars, while cedar, steel, or stone beds, filled with purchased soil, can run several hundred dollars each. Soil is often the largest expense, so buying it in bulk by the cubic yard usually saves money.
Final Thoughts
The best raised vegetable garden ideas make growing food easier and more enjoyable, whether that means a symmetrical layout around a greenhouse, a single tomato bed, or a salad patch by the back door. Good soil, steady water, and the right spot in the sun matter more than any material you choose.
Start with one or two beds this season, learn what grows well in your yard, and add more as your confidence grows. Within a few seasons, you’ll have a productive, tidy garden that brings fresh vegetables to your table all summer long.